The Perfect Avocado, Ham, Tomato and Cheese Grilled Panini


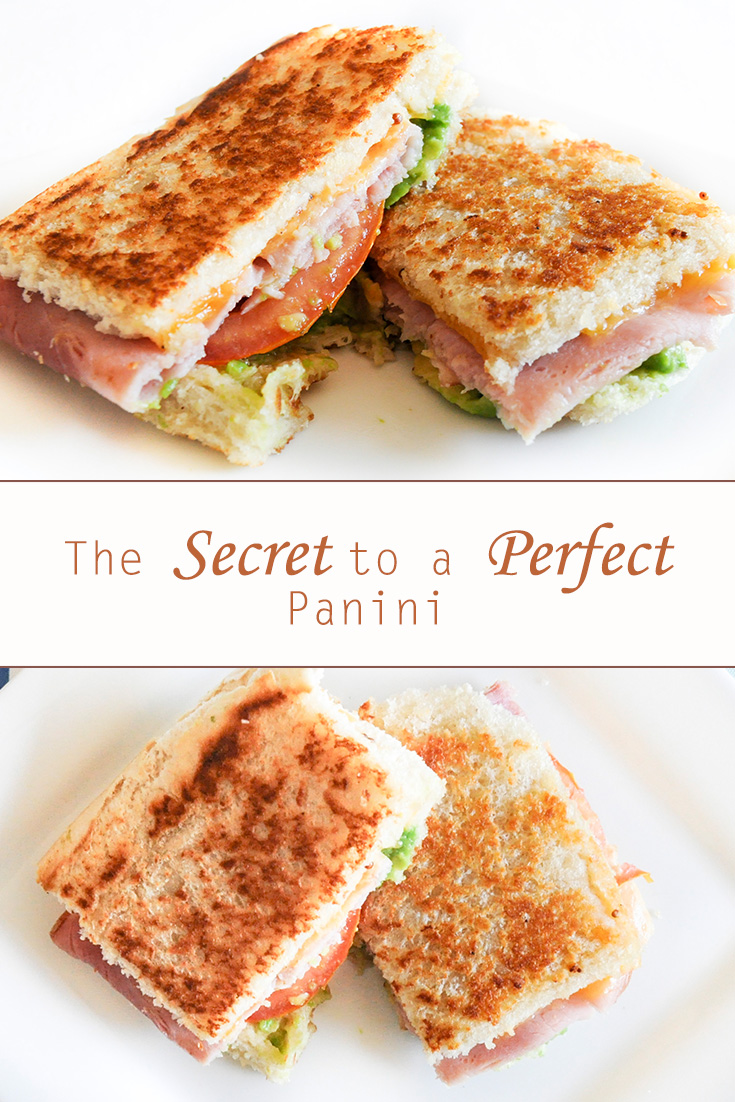
Grilled panini's are one of favorite lunch items to make.  I like them ten times better than plain turkey and peanut butter and jelly sandwiches.  Want to know the secret ingredient? Believe it or not it's not the panini press, they can be made without, it is fresh bread.  I've tried to make panini's with bread from a loaf, but it does not work, it does not taste the same.  It does not get as flat either. I really like using the avocado and stone ground mustard in the panini instead of regular mayonnaise and mustard. The avocado provides a spread inside, and is much healthier than mayonnaise and the stone ground mustard  provides a depth of flavor with a hint of sweetness.


Acocado, Ham, Tomato, and Cheese Grilled Panini
Author: Jennifer Crowther
Yield: 4
Prep Time: 5 Min Cook time: 5 Min

INGREDIENTS:
  • 1 fresh bread loaf
  • stone ground mustard
  • 1 avocado
  • 2 slices ham
  • 4-5 slices of cheese
  • canola oil
INSTRUCTIONS:
  1. Slice the fresh bread into panini slices. Cut the loaf the width of the panini's. Cut four slices from the cut loaf.
  2. Slice and add the avocado on one side and spread the stone ground mustard on the other.
  3. Put on the cheese, turkey and tomato slices. Place the two halves together.
  4. Turn the burner on a cast iron skillet over medium heat. Cover the pan with a thin film of oil.
  5. This step is important, Using a pastry brush coat one side of the panini.
  6. When the pan is hot, the oil starts to smoke, place the coated side of the panini on the skillet.
  7. Coat the other side of the panini.
  8. Cook 3-5 minutes per side or until golden brown, pressing down with a panini press or a heavy pan. Enjoy!


Read More »

Amazing Steak and Cob Salad

I made this cob salad recipe up when I was shopping in the fresh section of the grocery store.  I love cooking with seasonal ingredients and love getting inspired by seeing what is at the grocery store. It happens to be the time of year again for corn and peppers.  I chose an orange pepper to give a little color to the salad and ham instead of bacon because ham is not as crunchy, but provides the same pork flavor in the salad. The egg creates a nice softness and adds a nice flavor to the salad. 


We have really come to enjoy cooking steaks around here since we learned how to cook them. With steaks and roasts being about the same price as ground beef we have been cooking them a lot more. My local grocery store was having a sale on steaks for the 4th of July so I picked them up and saved a ton.  I have included some of the tips I have learned cooking steaks.


Amazing Steak with Cobb Salad
Author: Jennifer Crowther
Yield: 2
Prep Time: 25 Min Cook time: 10 Min

INGREDIENTS FOR COBB SALAD:
  • 1 corn on the cob
  • 1 boiled egg
  • 2 slices of ham
  • 1 orange pepper
  • 1 head of lettuce
INGREDIENTS FOR SEASONED STEAK:
  • 1 steak, any cut will do
  • 2 teaspoons kosher salt
  • 1/2 teaspoon pepper

INSTRUCTIONS FOR COBB SALAD:
  1. Fill a pan with enough water to cover a corn on the cob, but do not put it in yet. Heat the water to boiling and put in the corn on the cob for 10 minutes.
  2. Put an egg in a pan and fill with water 1 or 2 inches over the egg. Heat the water to boiling over medium heat. When the water is boiling remove from heat, cover for 12 minutes. Remove the water and fill the pan with cold water to stop the egg from cooking more.
  3. Add oil to a pan over medium heat. When the oil is hot add the ham. Brown slightly on both sides. Chop up the ham.
  4. Slice the orange pepper.
  5. Chop up the lettuce.
  6. Combine the ingredient and toss the salad.
  7. I like to dress this salad with Buttermilk ranch.
INSTRUCTIONS FOR SEASONED STEAK:
  1. Leave the steak out 30 minutes before seasoning.
  2. Combine the salt and pepper in a bowl.
  3. Spread the salt and pepper mixture on the steak. Press the mixture into the steak. See above picture.
  4. Turn the over to 375 degrees F.
  5. Heat oil in the pan.
  6. When the oil is hot place the steak in the pan with meat tongs. Do not touch the steak in the first 4 minutes. When the steak has achieved a nice brown sear turn the steak over with the tongs.
  7. Sear the other side.
  8. Place in the over until the desired doneness is achieved. It will be anywhere from 2-10 minutes. Do not over cook.
  9. Let the steak rest for 5-10 minutes.
Seasoned Steak
Read More »

Fresh Raspberry Greek Yogurt

My dietitian recently told me to eat more yogurt.  She recommended Chobani Greek yogurt.  I bought the fruit flavors for a few months. It was okay, but I found the fruit flavors lacking, the fruit didn't taste right. I had a thought to make my own yogurt from fresh fruit and see how it compares.  And let me tell you I bet this yogurt is better than any of those flavored yogurts out there.  It would win in a yogurt tasting contest hands down. It is super simple to make too.

Fresh Raspberry Greek Yogurt
Author: Jennifer Crowther
Yield: 36
Prep Time: 5 Min 

INGREDIENTS:
  • 3-4 fresh raspberries
  • 1 1/2 teaspoon sugar or to taste
  • 1 plain Greek yogurt
INSTRUCTIONS:
  1. Crush and stir the berries with a fork to release the juices.
  2. Add the yogurt and sugar and stir.
  3. Enjoy the freshest yogurt ever!
Read More »

Grilled Chicken with Avocado Salsa


Grilled Chicken with Avocado Salsa is one of my favorite meals to make and I super love all the fresh ingredients. I adapted this recipe from one I saw on Pinterest. I made a few changes based on things that went wrong the first time.

This whole meal took me about an hour to make and gave me family of 4 one day of leftovers.  I did cheat with the rice and use a packaged Spanish rice. I have made it from scratch before, it just adds a extra time.  I started with the rice first because it takes the longest to cook. I love Mise en place, ie the french term for getting all the ingredients and cooking utensils together before the meal.  It really saves a lot of time. That way I can just go go go.

Here are the recipes. The chicken and salsa can be served over rice, orzo or quinoa. I have included Spanish Rice directions.

Grilled Chicken with Avocado Salsa
Author: Jennifer Crowther
Yield: 8
Prep Time: 30 Min Cook time: 15 Min

INGREDIENTS FOR GRILLED CHICKEN:
  • 4 chicken breasts
  • 2 Tablespoons kosher salt
  • 1 teaspoon pepper
  • olive oil
INGREDIENTS FOR AVOCADO SALSA
  • 2 cups tomatoes diced, about 4 medium tomatoes
  • 5-6 fresh green onions, chopped
  • 1/2-3/4 cup fresh cilantro, chopped
  • 1 large avocado
  • 1 lime
  • salt and pepper to taste
INGREDIENTS FOR SPANISH RICE:
  • 1 box ZATARAIN'S Spanish rice
  • 1 can diced tomatoes
INSTRUCTIONS FOR GRILLED CHICKEN:
  1. Heat oil in 2 pans on medium heat.
  2. Turn on oven to 400 degrees F.
  3. Combine salt and pepper in a bowl.
  4. Remove moisture from chicken.
  5. Pat the salt and pepper mixture over the chicken both sides, lightly coating the chicken.
  6. Put the chicken on the pans, do not overcrowd the pan. Brown on both sides for about 3-5 minutes each side. Do not raise the chicken, it will release when ready.
  7. Put the chicken in the oven for 10-15 minutes or until the chicken is 160 F.
  8. Remove the chicken from the oven and let rest on a plate for at least 5 minutes.
INSTRUCTIONS FOR AVOCADO SALSA:
  1. Prepare the tomatoes, green onions, cilantro and place in a bowl.
  2. Cut the avocado last so it does not brown. Place in the top of the bowl.
  3. Juice about 1/2 lime and pour the juice over the avocado.
  4. Stir the ingredients in the bowl together. Add more lime juice to taste.
  5. Add salt and pepper to taste.
INSTRUCTIONS FOR SPANISH RICE:
  1. Prepare the rice per the boxes instructions
I hope you enjoy the recipe. We sure did! 


Read More »

Magnolia Bakery Vanilla Cupcakes and Chocolate Icing

I used to live in New York, whenever I would visit the city I would stop at Magnolia Bakery and get a cupcake.  I was super sad when I moved away.  No more cupcakes :(  I put the Magnolia Cupcake Bakery cookbook on my Amazon wishlist and my husband got it for me for mother's day last year.  I've made several recipes from the book since then.  The recipes usually turn out amazing, especially the frosting, but the cupcakes are a little dry at times.  This time I put in a little less flour and they turned out great! I made the cupcake pictured below for a baby shower.  They tasted amazing. Now you can make them too!


Vanilla Cupcakes Recipe
Author: Adapted By Magnolia Cupcake's Recipe Used With Permission
Yield: 36
Prep Time: 30 Min Cook time: 25 Min

INGREDIENTS FOR VANILLA CUPCAKES:
  • 1 cup unsalted butter
  • 2 cups sugar
  • 4 large eggs
  • 1 cup milk
  • 1 teaspoon vanilla extract
  • 1 1/2 cups sifted self rising flour
  • 1 cup sifted flour
INGREDIENTS FOR CHOCOLATE BUTTERCREAM FROSTING:
  • 1 1/2 cups unsalted butter
  • 2 Tablespoons milk
  • 9 ounces semisweet chocolate, melted
  • 1 teaspoon vanilla extract
  • 2 1/4 cup powered sugar
INSTRUCTIONS FOR VANILLA CUPCAKES:
  1. Leave the butter, eggs and milk out for at least an hour before making the cupcakes.
  2. Preheat over to 350 degrees.
  3. Put cupcake wrapper in cupcake pans.
  4. Sift the flours, measure, and combine.
  5. Beat the eggs until well blended.
  6. Combine the milk and the vanilla.
  7. Cream the butter for at least 3 minutes with mixer.
  8. Gradually add the sugar and cream for 3 more minutes.
  9. Add the eggs to the butter and sugar mixture, beating well.
  10. Alternate between add the milk mixture and the flour mixture. Mix well but do not over beat.
  11. Using a number 20 food disher scoop the cupcake batter into the cupcake wrappers.
  12. Bake for 20 to 25 minutes, or until a toothpick comes out dry and the cupcake is spongy when pressed upon.
  13. Let cool and ice.
INSTRUCTIONS FOR CHOCOLATE BUTTERCREAM FROSTING:
  1. Leave the butter, and milk out for at least an hour before making the frosting.
  2. Melt the chocolate using a double broiler method. Boil some water over the counter, place a heat resistant bowl on top. IMPORTANT-Do no let any water get in the bowl or the chocolate will seize.
  3. Let the chocolate cool for 15 minutes.
  4. Beat the butter for 3 minutes, incorporating lots of air.
  5. Add the milk and mix well.
  6. Add the chocolate and beat for 2 minutes.
  7. Add the vanilla extract and beat for 3 minutes.
  8. Add the sugar gradually, beating on low. You may need more, you may need less depending on your desired frosting consistency and temperature of the butter.
  9. Spread on your cupcakes and enjoy!
PS. You will want to eat everything the icing touches, the real chocolate in the recipe gives this icing a very real delicious edge.


Read More »

The Perfect Kettle Corn

I love the kettle corn from Trader Joe's. I get some every time I go, unfortunately is not often because there isn't one by me. My husband bought me a popcorn popper for Christmas and I was excited to try to make some kettle corn. I picked up some kettle corn topping at the store, popped some popcorn and sprinkled on the topping. Alas is did not taste like kettle corn. So I looked online, found a recipe, tried it and failed, was going to give up, but decided to try one more time. I adjusted the recipe, cooking method and walla, it was perfect. I'll probably be making this several times a week. You don't need a special popcorn popper or a special seasoning just a pot and basic ingredients that you probably have on hand.

                         
Perfect Kettle Corn
Author: Jennifer Crowther
Yield: 4
Prep Time: 1 Min Cook time: 10 Min

INGREDIENTS:
  • 1/3 cup corn kernels
  • 2 1/2 Tbsp Trader Joe's canola oil
  • 1/2 tsp Kosher salt
  • 1/4 cup sugar
INSTRUCTIONS:
  1. Heat oil and 3 popcorn kernels in a large flat pot over medium heat.
  2. Once one popcorn kernel has popped put in the rest of the kernels.
  3. Add sugar and salt evenly around the pan. Stir in with the kernels. Put the lid back on the pot.
  4. Wait for the kernels to start popping. When they start popping lift the pan and shake the popcorn side to side. Set down every once in a while for the pot to stay hot.
  5. When the popcorn starts to not pop as quickly immediately remove from the heat and lay popcorn on parchment paper on a cookie sheet. Use a spoon to spread out the popcorn. It will be a little sticky. And should not be discolored.
  6. Wait five minutes and enjoy. If you don't devour it all right away you can store in an air tight container for several days.
*I used a clear lid. It was very helpful to see what stage the popcorn was at and that it wasn't burning. 
Read More »