Watkins Original Gourmet Baking Supplies Review

Recently Watkins contacted and sponsored me to review their baking supplies. I jumped at the opportunity. I love baking and trying new things.

Watkins has been around since 1868 and have a headquarters in Minnesota. They make a variety of products; extracts, spices, food coloring, soaps, lotions, cleaners, pain relief, and body scrubs. I had never heard of them before, but the more I have learned, the more I love this company. I love that their products are pure and high quality. I am always on the lookout for good baking products.

I received the following in my box; baking vanilla, pure lemon extract, pure almond extract, pure coffee extract, pure ground cinnamon, and food coloring. I was especially excited about the food coloring because it does not have dyes in it. I have been trying to avoid food dyes with my kids.


The first thing I decided to try was the vanilla. It came in an 11 ounce bottle. I decided to make some chocolate chip cookies.


I used the King Arthur Flour Chocolate Chip Oatmeal recipe for the chocolate chip cookies. The turned out fantastic. I even had someone comment to me they could taste something different in the cookies and asked if I had used something special. I told them I used Watkins vanilla.


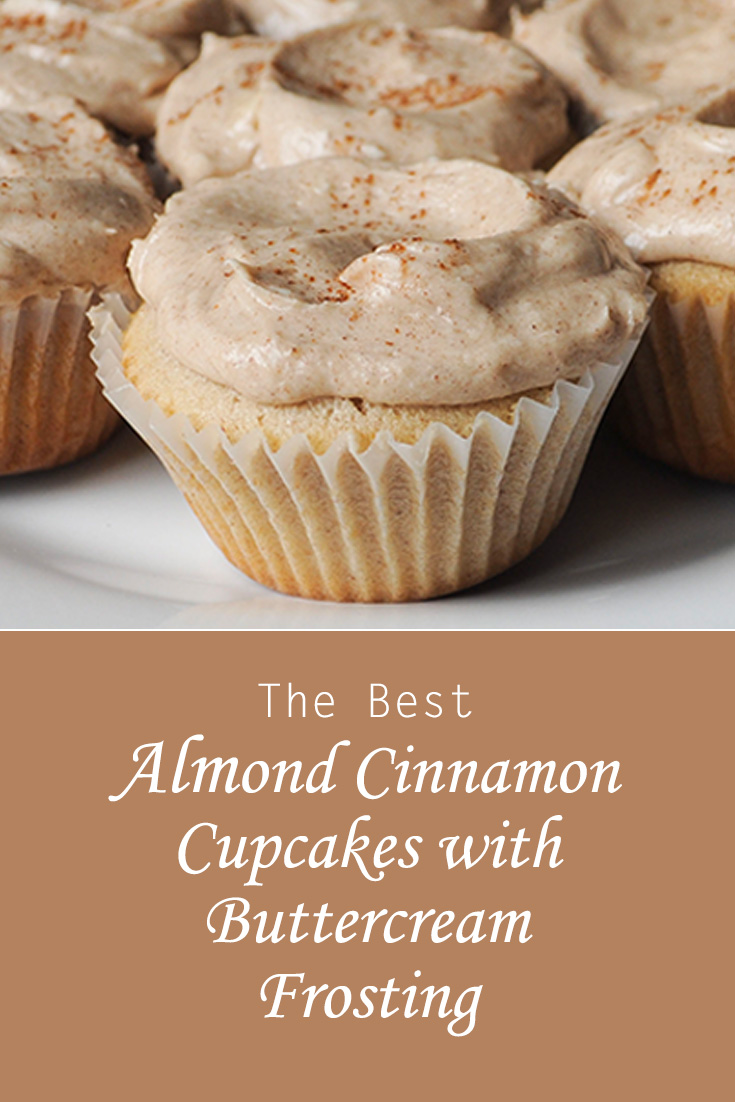
Next up I made almond cinnamon cupcakes with an almond cinnamon buttercream frosting that tasted amazing!


Here is the finished product and they tasted as amazing as they look here. I will definitely be making these again. I took them to a function and someone had two at the event and wanted to take more home with her.


 The last thing I tried was the lemon extract, the food coloring and the vanilla again. I made lemon sugar cookies with a lemon buttercream frosting.


The lemon cookies turned out delicious and the frosting colors were amazing! The red was a little pink, but that is typical with red food coloring. I would probably just have to put in more dye to make it darker. I will definitely be using this dye in the future because it was so good and I like that all the ingredients in the dye were natural and not artificial. I let my kids frost the rest of the cookies and they had a lot of fun.


All in all what did I think of Watkins baking products? I LOVED all of them and will be using all of them again. My kids kept begging for all the treats we made this week. I have not really cooked with almond and lemon extract and was excited to go out of my comfort zone and try something new. I would definitely recommend picking up some of these products for baking.


Read More »

Lemon Sugar Cookies with Lemon Buttercream Frosting

Do you want to make some really good lemon sugar cookies with lemon frosting? These are a soft sugar cookie with a delicious buttercream frosting with a hint of lemon. I like that the lemon is not overpowering in this cookie. I have the recipe for you. I decided to dye mine too to make them really fun for my kiddos.


Adapted from https://butterwithasideofbread.com/lemon-sugar-cookies/

Lemon Sugar Cookies with Lemon Buttercream Frosting
Soft Cookies with a Hint of Tang
Author: Jennifer Crowther
Yield: 24
Prep Time: 15 Min Cook time: 12 Minutes 

INGREDIENTS FOR LEMON SUGAR COOKIES:
  • 1/2 cup softened butter
  • 1 cup sugar
  • 1 egg
  • 1 tsp Watkins vanilla extract
  • 1/3 cup sour cream
  • 1/2 tsp Watkins lemon extract
  • 1 Tbsp lemon zest
  • 1/2 tsp salt
  • 1/2 tsp baking soda
  • 2 cups all-purpose flour
INGREDIENTS FOR LEMON BUTTER CREAM FROSTING:
  • 1/2 cup softened butter
  • 1 tsp vanilla
  • 2 Tbsp milk
  • 1/2 tsp Watkins lemon extract
  • 1 Tbsp lemon zest
  • 4 cups powdered sugar
INSTRUCTIONS FOR LEMON SUGAR COOKIES:
  1. Preheat the oven to 375 degrees. Line the cookie sheet with parchment paper.
  2. Cream the butter for 1-2 minutes.
  3. Add the sugar and cream.
  4. Add the egg and cream.
  5. Add the vanilla, sour cream, and cream
  6. Add the lemon extract and lemon zest and mix.
  7. Combine the salt, baking soda, and flour.
  8. Fix in the flour mixture.
  9. Use a disher to make rounded balls.
  10. Bake for 10 minutes.
INSTRUCTIONS FOR LEMON SUGAR COOKIES:
  • Cream the butter.
  • Add the vanilla and milk and cream.
  • Add the lemon extract and zest and cream.
  • Add the powdered sugar 1 cup at a time and mix until the frosting is the right consistency. May need to add a little more or less than 4 cups of sugar.
I hope you enjoy the cookies!


Read More »

Almond Cinnamon Cupcakes with Almond Cinnamon Butter Frosting

Do you want to make some AMAZING almond cinnamon cupcakes? I have the recipe for you. I recently made these and they were delicious.


Adapted from the recipe, https://www.lifeloveandsugar.com/2014/10/08/cinnamon-sugar-almond-cupcakes/

ALMOND CINNAMON CUPCAKES
Author: Jennifer Crowther
Yield: 25
Prep Time: 10 Min Cook time: 25 Minutes 

INGREDIENTS FOR CUPCAKES:
  • 3/4 cup butter
  • 1 cup sugar
  • 3 egg whites
  • 1/2 cup sour cream
  • 1/2 cup milk
  • 3 tsp Watkins almond extract
  • 1 2/3 cups all purpose flour
  • 1/4 tsp baking soda
  • 1 tsp baking powder
  • 1 1/2 tsp cinnamon
INGREDIENTS FOR CINNAMON BUTTERCREAM FROSTING:
  • 1 cup butter
  • 4 cups powdered sugar
  • 2 1/4 tsp cinnamon
  • 1/2 tsp almond extract
  • 2-3 Tbs milk
INSTRUCTIONS FOR CUPCAKES:
  1. Preheat oven to 350 degrees. Put cupcake wrappers in cupcake baking apparatus.
  2. Cream the butter for 2 minutes.
  3. Add the sugar and continue to cream.
  4. Add the eggs and beat for 2-3 minutes.
  5. Add and mix the sour cream.
  6. Combine the milk and the almond extract.
  7. Sift the flour with the baking soda, baking powder, and cinnamon.
  8. Alternate add the wet and milk mixture and flour mixture to the butter mixture.
  9. Fill the cupcake liners with a 20 disher.
  10. Bake 20-25 minutes or until cupcakes spring back to the touch.
  11. Let cool and frost.
  12. Sprinkle with cinnamon.
INSTRUCTIONS FOR CINNAMON BUTTERCREAM FROSTING:
  1. Cream the butter.
  2. Add the milk and almond extract and mix.
  3. Mix in the cinnamon.
  4. Add the powdered sugar 1 cup at a time and mix until the frosting is the right consistency. May need to add a little more or less than 4 cups of sugar.
I hope you enjoy the cupcakes as much as I did!

Read More »

Beef Stroganoff: Easy and Delicious Slow Cook Recipe

When I was in college I feel in love with this Beef Stroganoff recipe. We had roommate dinners in college, where one roommate would cook dinner for all the rest of the roommates one night a week. When we got home from school dinner was always there. My roommate made this Beef Stroganoff and every so often I would ask her to make it for us because I loved it so much. When we parted ways I made sure to grab the recipe and now I so excited to share it!


This recipe is super easy. Throw the ingredients in the slow cooker, boil the noodles and done!

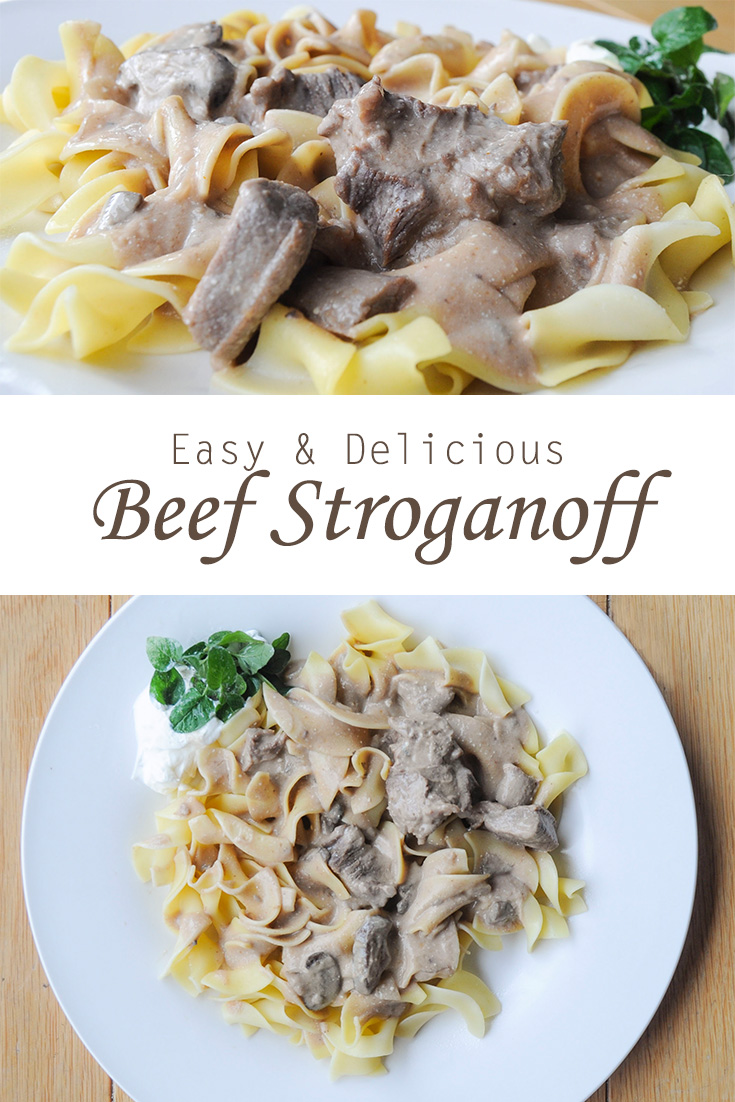
I like to either grab any kind of beef for this meal. I have made it with several different cuts; stewing beef (pictured here), steak, and a roast. If I use a steak or a roast I throw in the whole thing and then cut the meat right before I serve it. I bought the mushrooms pre-cut to make it that much faster. The only thing I had to really prep was the onions and that was super fast.

BEEF STROGANOFF
Author: Jennifer Crowther
Yield: 12
Prep Time: 15 Min Cook time: 8 Hours

INGREDIENTS:
  • 1 onion, diced
  • 5 to 10 fresh mushrooms, sliced
  • 1 slab round steak, cut into pieces (stewing beef makes it easy)
  • 2 to 3 Tablespoons Worcester sauce
  • 4 cans cream of mushroom soup
  • 1/4 cup ketchup
  • garlic
  • 1/4 to 1/2 cup sour cream or cream cheese
INSTRUCTIONS:
  1. Add all ingredients to a crockpot, except cream.
  2. Mix together and let cook on high 4 hours or low 8 hours.
  3. Add cream just before serving.
  4. Serve on rice or egg noodles.
Here is the finished product, yummy goodness.


I hope you enjoy this recipe as much I do. I brought it to a church function last night where there 20 other crock pot soups and it was almost gone when we left. (Some other soups were still full.) There is just enough for one more serving. Everyone really loved it. I think you will too!


I am sharing this recipe as part of Slow Cooker Spooctacular event hosted by Simple Simon and Company. Check out their tips, other posts and a giveaway to win your own slow cooker. 

Read More »

Top 15 Things to Do In Seattle

Have you been to Seattle, Washington? Seattle is one of my FAVORITE places to visit and to live. I lived there in 2004 as intern at Boeing, and from 2005-2008 when I was an engineer at Boeing. I dated my husband in Seattle, we got engaged there, and we bought our first home together. Seattle has a special place in my heart.


I started this list as a top ten things to do in Seattle, but it morphed into 15 as I looked through my pictures and thought of all the fun things to do there. I could probably add 15 more things to do. The list is never ending. Maybe I will have to do a part two someday.

Why is Seattle so amazing? Seattle has all the draws of a large city; tall buildings, amazing restaurants, and lots of shopping. It also has one of the BEST outdoor lives around. It is the best of both worlds. I have included both "downtown" Seattle activities to do, and ones that are a distance from Seattle. I would definitely recommend renting or bringing a car to truly appreciate all the Puget Sound area has to offer. Seattle is not a commuter city like New York City or Tokyo. It is hard to get around on public transportation.

What is the weather like in Seattle? For one it never snows! It does rain, but not as much as everyone says it does. Seattle is close to the Puget Sound and the Pacific Ocean is not very far away. The weather there ranges from a low of 40 degrees in the winter to about a high of 80  in the summer. The average temperature is about 60 degrees. I absolutely love the weather there, but definitely bring a jacket.


Here is my list! I listed them in order of my favorites.

1. Alki Beach Park
Why is Alki Beach number one? It is one of my favorite places to be in Seattle. It is on the side of Elliott Bay from downtown Seattle in West Seattle. The drive there is gorgeous. The picture below is a picture of Seattle from one of the lookout points on the way to Alki. Once at Alki there are miles of beach with amazing restaraunts, volleyball courts, fire pits, walk ways, benches, and GORGEOUS views. I have spent many a night at Alki beach and love it more every time I go.
  • Cost: No Cost
  • Location: 1702 Alki Ave. SW, Seattle, WA 98116
  • Hours: 4am-11:30pm

2. Theo Chocolate Factory
Theo Chocolate has a factory and retail store in the Fremont neighborhood in Seattle. My husband and I attended a tour there when I worked at Boeing. We were given so much chocolate and the tour was super cheap for what we got. I rarely eat any chocolate besides Theo Chocolate now. They have tours for adults and kids. Read more about the factory in a blog post I wrote.
  • Cost: The store is free, the tour costs
  • Location: 3400 Phinney Avenue North, Seattle WA 98103
  • Hours: 10am-6pm

3. Fremont Troll
There is a troll under a bridge in Fremont neighborhood in Seattle. It is definitely worth a visit and very close to the Theo Chocolate Factory.
  • Cost: Free
  • Location: Troll Ave N, Seattle, WA 98103
  • Hours: all day
4. Seattle Underground Tour
I have probably been in the Seattle Underground Tour 2 or 3 times. I took visitors there every time they came. Seattle was burned to the ground in 1889 because all the building were wooden. Instead of rebuilding the same buildings they took the opportunity to raise the level of the city to help prevent flooding, but they did not raise the sidewalks. The street was a different level than the sidewalk and store fronts, one story higher. In order to cross the street  people would have to climb down one ladder and up the other. Eventually they make sidewalks at the street level, but the old underground is still intact and can be visited. The tiles in the picture below can be seen from above and below. When walking in Seattle streets remember that under those tiles is a whole other world.

The 75 minute tour has so much information about underground Seattle and is so cool to see. Definitely add it to your list.
  • Cost: $22 adults, $20 senior, $20 student, $10 youth, 6 and under free
  • Location: 614 1st Avenue, in Pioneer Place Park, Pioneer Square, between Cherry and James Street.
  • Hours: Tours every hour, April-September 9am-7pm, October-March 10am-6pm, extended hours may be available, check website, closed Christmas and Thanksgiving


5. Vashon Island Light House (Point Robinson)
Any of the surrounding islands in Seattle, San Juan, Whidbey, Camano, Vashon, Bainbridge, Orcas, Lomez are worth a trip. Not only is the experience of taking a ferry fun, but the island so beautiful and peaceful. Most ferries will even allow cars.

One of my favorite islands to visit is Vashon Island. It is such a peaceful place to go. There is a beautiful light house and lovely beach there. On the weekends there is a farmers market. There is even a tree with a bike in it. Apparently Don Puz left it in the woods when he was a kid and the tree grew around it. Check out the book, Red Ranger Came Calling for a kids "story" about the bike.
  • Cost: No Cost, Ferry Costs
  • Location: 3705 SW Point Robinson Rd, Vashon, WA
  • Hours: Store: Saturdays and Sundays, noon to 5:00 p.m., Tours: Sundays May-September, otherwise call


6. Deception Pass
Deception Pass is another amazing site to see in Seattle. It is a bridge on I-20 connecting Fidalgo Island to Whidbey Island. The bridge is amazing to look at and the views are incredible.
  • Cost: Free
  • Location: Deception Pass (off I-20)
  • Hours: Open all day


7.Space Needle 
What visit to Seattle would be complete without a visit to the iconic Space Needle? I have only gone up it once, but visited it a lot to show visitors. The are a lot of attractions surrounding the Space Needle; KeyArena, Pacific Science Center, Seattle Children's Museum, McCaw Hall, Memorial Stadium, Mural Amphitheatre, Musuem of Pop Culture and Chihuly Garden and Glass. They have updated the surrounding area alot. Not all those places were there when I went the first time. Be careful wandering outside of the Space Needle area, the neighborhood can be a little scary.
  • Cost: $22 for adults, $14 for youth, free under 5, senior $19, can get combo tickets for other attractions
  • Location: 400 Broad St, Seattle, WA 98109
  • Hours: 10am-8pm
 

8. Tiger Mountain Trail
As I have already said the scenery in Seattle is AMAZING. One of my favorite trails in Seattle was the Tiger Mountain Trail, but there are several others that are amazing too. Check out the Washington Trails Association for all the trails in the area. Since it rains in Seattle the trails are very lush and green, it is almost like being in the rain forest.
  • Cost: No Cost
  • Location: Tiger Mountain Trail, Issaquah, WA 98027, Exit 20 off I-90
  • Hours: Open all day

9. Museum of Flight
I may have to mention The Museum of Flight because worked for Boeing while I lived there. The museum features so many cool planes even one named after me. hehe. The museum also features flight simulators, a 3D Movie, and a pilot experience. It has over 150 aircraft including; a Concorde, Boeing 747, Blackbird, Boeing 737, Boeing 80A and many more airplanes. It is one of the largest air and space museums in the world.

The museum of flight is across the street from the Seattle headquarters for Boeing, but entrance to Boeing facilities are limited to Boeing employees and invited members. Entrance is allowed to Boeing Field across the street where planes are tested and delivered to customers. It is also a functioning airport.
  • Cost: $21 for adults, $18 for senior, $13 for youth, free for 4 and under
  • Location: 9404 E. Marginal Way South, Seattle, WA 98108-4097
  • Hours: 10am-5pm, free first Thursday of each month, closed Thanksgiving and Christmas

10. Old Curiosity Shop and Pier
Seattle's piers are all numbered and a walk along them is very romantic. My now husband and I had lots of dates down there. There are many shops and restaurants along the pier, including the Old Curiosity Shop which features some very unique and curious items.
  • Cost: No Cost
  • Location: 1001 Alaskan Way, Pier 54, Seattle, WA 98104
  • Hours: 10am-6pm

11. Woodland Park Zoo
The Woodland Park Zoo is a very fun zoo to visit. The design is very open and the animals are allowed lots of space to roam. I would definitely suggest a visit.
  • Cost: $14.95 for adults, $9.95 for kids, $2 and under is free, available with combo tickets
  • Location: 5500 Phinney Ave. N. Seattle WA 98103
  • Hours: depends on time of year, 9:30am to 4pm, closed on Christmas
12. Snoqualmie Falls
Snoqualmie Falls is a hidden gem in Seattle. It is a huge waterfall. Sorry I did not take a picture of the whole waterfall, but my sister is really pretty!
  • Cost: No Cost
  • Location: 1001 Alaskan Way, Pier 54, Seattle, WA 98104
  • Hours: 10am-6pm

13. Mount Rainer
Mount Rainier is huge and definitely worth a visit. There is a huge visitors center and lots of trails and camping spots.
  • Cost: No Cost
  • Location: 1001 Alaskan Way, Pier 54, Seattle, WA 98104
  • Hours: 10am-6pm

14. Pike's Place Market
Pike's Place is far down on my list, because it is not my favorite place to visit. But it is a MAJOR tourist attraction and most people really want to go. It has shops, a market, restaurants, a Gum wall down the alley, clubs with musical acts etc. There is even a left handed store. The street is make out of cobble stones and yes they throw the fish. I think it is over priced and crowded because every one goes there. It is good to visit once, but not to buy things from.
  • Cost: No Cost
  • Location: 1st Ave and Pike St., Seattle, WA 98101
  • Hours: Open 363 days a year, different parts of the market open at different times. 10am-4pm most of the general market is open, certain areas are open earlier and later.


15. Seattle Mariners Baseball Game at Safeco Field
This is last on my list because I am not a fan of baseball, but the Stadium is amazing. There are so many restaurants there, there is even a Ben and Jerry's. I love wandering the stadium. I reluctantly attended many games, sitting in all kinds of seats; seats in the sun, shade, padded seats and even a the Microsoft box office. The box office was my favorite because some executive from Microsoft was there an they ordered us food. And I did not have to watch the game for hours. I also included this on the list because I know some of you will probably like baseball.
  • Cost: Depends on the game
  • Location: http://1250 1st Ave S, Seattle, WA 98134
  • Hours: Depends on game
There it is, my top 15 things to do in Seattle! Writing this makes me want to move back. I hope you enjoy your visit and if you have been to any of these places or have any questions about Seattle I would love to hear them in the comments!


*All of these pictures were taken by me. Please do not use without written permission.
Read More »

The Speaker That Changed My Life: JBL Clip + Speaker Review


Earlier this year I had never heard of a wireless speaker. I did not even know they existed. I entered a contest on Instagram and Directv Now when they were promoting a Taylor Swift concert in Houston, Texas. They told me they were sending me a surprise and much to my amazement I got this JLB Clip + wireless speaker.


How It Works
This speaker is amazing for what I use it for. We love listening and dancing to music in our home; Moana, Frozen, and of course Taylor Swift. We have invented so many ways to make our phones louder, putting them in cups to echo, putting them in our pockets with the speakers out...etc. But that does not even compare to this speaker.

The speaker works through blue tooth technology. It blinks blue when waiting for a connection. When the connection is made it turns to solid blue. And it is super easy to do. On the phone side I went into bluetooth settings and searched for the speaker and hit connect. Easy as that.

The songs and such are controlled from phone, the same as always, but the sound is transmitted through the speaker. The volume can even be controlled from the phone or from buttons on the sides of the speaker.

There is also a power button on the side of the speaker. When the speaker needs to be charged, which is not very often, the blue button on the side will turn red.

The charging port is universal and can be charged with a firewire cable. I use my Amazon kindle charger for charging the speaker.


The speaker can also be attached to a belt loop. The next model of JBL clip has a carabiner instead of this loop making it possible to attach to more places.


What did I think?
I was amazed to say the least! The sound quality inside is very good, much better than a cell phone propped in weird positions. The battery lasts forever, we hardly ever have to charge it. It is SUPER portable, I can take it anywhere. It has transformed how we listen to music in our house. We love it. I honestly do know why we did not get one sooner. It was probably because I did not know they existed!

I would highly recommend this speaker to anyone. Let me know if you get it, your life will never be the same.


Read More »

Easy DIY Fruit Bouquet

Have you ever seen a fruit bouquet? I think they are genius. Not only are they beautiful, but they are delicious to eat, and they are healthy! That is three wins.

Earlier this year I made this fruit bouquet for a friend. These can be made for any occasion, birthdays, holidays, thinking of you etc. And they are not that hard to make, the pineapples and melting the chocolate took the longest time. And that was not long at all.

Supplies for a fruit bouquet
  1. Fruit- I used pineapple, green and red grapes, and strawberries.
  2. Cookie cutter
  3. Skewers-I got these at my local grocery store meat department.
  4. Vase
  5. Tissue paper
  6. Foam or pool noodle to go inside
  7. Bow
  8. Simple syrup (water and sugar)
  9. Pastry brush
  10. Cookie sheet-can line with wax paper
Steps to Make a Fruit Bouquet
  1. Prepare the vase by putting the tissue paper in first, then put in the foam. Tie the bow around the vase.
  2. Wash all the fruit.
  3. Make a simple syrup, heat 1 part water with 1 part sugar until sugar is melted.
  4. Melt and temper chocolate using the double broiler method. Ie place a pan of water on the stove. On top of that place a heat resistant bowl. Heat water to a low boil or just below boiling. Melt chocolate in the bowl.
  5. Cut pineapple open. Slice in rectangles. Use the cookie cutter on the slices to make heart shapes or whatever shape is desired.
  6. Dip the strawberries in the chocolate. I did half and half to create a color differential on the arrangement.
  7. Place all fruit on the cookie sheet. Brush with the simple syrup. Let dry for a few minutes
  8. Place all the fruit on the skewers. This will be a little sticky depending on how dry the fruit is. The pineapples are the most tricky. They are slimy and like to fall off.
  9. Stick the skewers in the foam and arrange the fruit randomly.
That is all the steps to make the perfect Fruit Bouquet. Whoever gets it will love it! Let me know if you make one. I would love to see it.


Read More »

How to Organize Kids Toys Without Losing Your Mind

As my kids started getting older it seemed the number of toys in our house increased exponentially. Everywhere I looked there was toys. And then the toys started coming with lots of smaller parts. At first we put them in a big box.


But it got really frustrating trying to find the set of toys they wanted to play with. My kids would dump all the toys out and then there would be an even bigger mess.


One day I was at the library when a light bulb went off. The library stored all puzzles in plastic containers. I instantly knew this had to be my motto. I was going to buy a bunch of plastic containers for our toys.

I picked Sterilite containers to store our toys. I liked Sterilite containers because they came in all sizes, the mini clip box, small clip box, large clip box and deep clip boxes. These boxes store 90% of our toys. The other 10% of the toys, the train set, duplo blocks and cars get stored in larger Sterilite containers. The different sized boxes can be a little tricky to find. I found that plastic storage seems to be seasonal in stores. The best places to find them have been Target, Home Depot and Menards. But it really depends on the season. I have also found them online.


These containers stack on on another, the lids of the deep and large clip boxes are interchangable, and the containers fit really well in the space I have. They even fit in our Kid Craft kitchen. That is where we store our kitchen toys.


The rules for the boxes are all like toys get a specific box. We have a boxes for musical instruments, bugs, fluffs, legos, Lincoln logs, plastic kitchen tools, real life kitchen tools, Melissa and Doug Pizza and birthday cake sets, character figurines, Tinker Toys, animals, Minnie Mouse Toys, wooden blocks, puzzles, Lego Train etc. The best part about it is my kids know how to sort their own toys now. If my kids no longer want the toy set we can give that set away full and the container can be used for another set of toys. I always buy a few extra around the holidays to have the different sizes on hand for new toys we get.

At first my husband did not like the cost of containers and did not like how much longer it took to clean up, ie we had to organize instead of throwing in a box. But overtime he has come to see that the system works very well and has not said anything about it since. And now it does not take us very long to clean up because we know where everything goes. And the kids can play with a set of complete toys!


I loved this system so much that I incorporated it for my crayon collection, crafting supplies, and office supplies. I can keep like things with like things and find them really easily. It takes a little bit of startup cost, but it is totally worth it to see a clean and organized playroom. Let me know what you think. Would this system work for your house?

Here are some after pictures of my house.


Read More »