Top 10 Things to do with Kids In New York City

Have you ever been to New York City? It is my absolute favorite city in the world. There is so much to do there. My dream was always to live there for a year. Well in 2012 my dream came true! My husband got stationed at West Point and we got to go down to New York City all the time. When I visited there my daughter was 18 months and I was pregnant with my 2nd. We were able to get out and enjoy so many things the city had to offer. We were able to get around on the subway just fine. We made sure to map out the locations with elevators because I carried her around in a stroller. If I had to do it over again I would have a light weight stroller with an Ergo. When I needed to go up stairs I would put her in the Ergo, fold up the stroller. It would take more time, but be worth it because there would be more Subway stops to use.

There are so many fun things to do with kids in the city, but these are my top ten. It is especially good if you are short on time and want to hit the best things.Watch out in the next couple of months, I will be covering my favorite holiday things to do with kiddos in New York City.


1. Brooklyn Bridge Park
Why is this number one? It is number one because it is an AMAZING park. It sits at the base of the Brooklyn Bridge. The views there are unlike any other. Kids can play and mom and dad can sit back and appreciate the gorgeous view of NYC. That is exactly what I did. Plus the park is AMAZING. Did I say that already??? Because it is. The park is 1.3 miles long. It was transformed from a cargo shipping area into a park to help revitalize the area and it has! The park consists of 6 piers, Main Street, John Street, Brooklyn Bridge Plaza, and Fulton Ferry Landing. The park has activities for all ages. It has state of the art playground equipment, seriously I have never seen some of the equipment they had before in my life. The playgrounds are called Water Lab, Sandbox Village, Slide Mountain, and Swing Valley. They have bocce , basketball, handball , shuffleboard courts. They have picnic areas, splash pads, green space, athletic fields, sand volleyball courts, dog runs, and a Carousel. And it is not even finished. If you want to get a good view of NYC and your kids to have fun at the same time come here.
  • Cost: free
  • Location: 79th St. & West Drive Brooklyn, NY
  • Hours: depends on the show
  • Subway Stop: A, C High Street, F York Street, 2, 3 Clark Street, R Court Street, 2, 3, 4, 5 Borough Hall
2. Central Park Puppet Show at the Swedish Cottage Marionette Theater
Another one of my favorite places to go in New York City was the Swedish Cottage Marionette Theater in Central Park. The theater features a puppeteer production and changes all the time. My kids loved the puppet show tremendously. I was surprised they sat still for it, but they did.  Word of warning however, these tickets go fast so make sure to book them in advance. If you are like me and like to see things on a whim you can go the day of and ask for standby tickets. We were able to get in, but I would not recommend it especially if your kids are looking forward to going. You can find tickets here. They also schedule birthday parties there. Make sure to grab your tickets and go! Afterwards there are so many other things to see in the park.

  • Cost: $8 per child and $12 per adult
  • Location: 79th St. & West Drive
  • Hours: depends on the show
  • Subway Stop: 81 St B, C
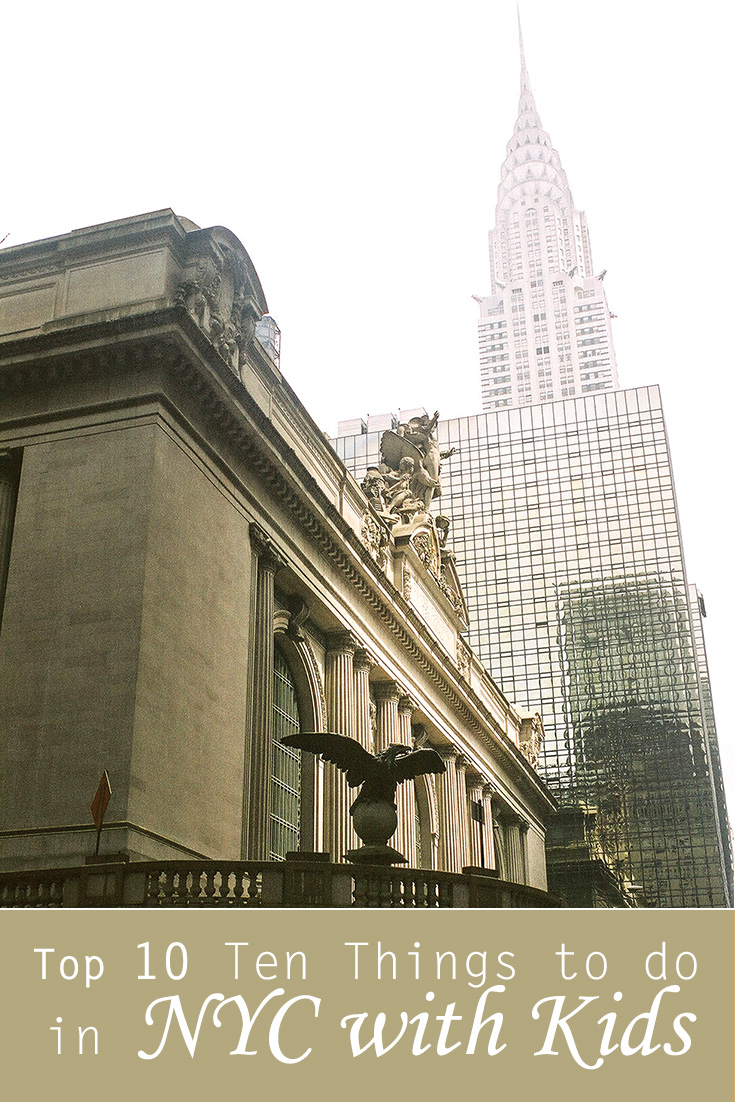
3. Grand Central Terminal
A visit to Grand Central Terminal is super easy because it is the hub for so much transportation in New York City. It is probably the place I "visited" most when I was there. The terminal was built to be elegant, but functional. There are 85 millions passengers that travel there annually. The terminal is the hub of the Metro-North Railroad, which travels to New York and Connecticut. The subway is located on the southeast corner of the terminal. Amtrak started recently running trains out of Grand Central, though the main hub for Amtrak is Penn Station. When we came to the city we would come from the north from Beacon and travel into the city. My daughter was fascinated with the train ride. The train ride is relatively reasonably prices. We have taken tourist trains in other places and paid a lot more.


What is there to do there? Shopping, train rides or sighting, tours and eating! First off is the whole place is very stroller friendly. The terminal features two levels, a main concourse. That is the one seen in movies where people are running to Grand Central. People do really move quickly. I found the best place to "stand" to get your bearings was in the middle by the ticket counter. There I could access the free internet and see where we were going to go that day. Or wait for my husband or friend. The upper level also features 68 of some of the best shops in the city. My favorites were the fancy chocolate stores, Apple and Papyrus. The lower level features an amazing array of restaurants including Shake Shack and Magnolia Cupcakes. It is one of my favorite levels. There you will really see the people of the city. One of my favorite times there was when an amazing cello player was just playing. My daughter and I stopped for an hour or so just to listen to this private concert.
One of my favorite parts about visiting Grand Central was exiting it. Haha funny I know. It was at that moment I knew I was in New York City and excited for an amazing day.


There is also a New York Transist Museum located that tells the story of mass transportation in New York City. I never visited, but I have a feeling my son would love it now.
  • Cost: free except tours and train rides
  • Location: 89 E 42nd St New York, NY 10017
  • Hours: 5:30am-2:00 am
  • Subway Stop: S, 4, 5, 6, 7 and Metro North
4. Dylan's Candy Bar
Have you heard of Dylan's Candy Bar? My friend told me about it. It is a candy store with three floors of candy and a candy cafe. Your kids and you will be in heaven!

Photo courtesy of Alonna Whitehead
  • Cost: free except tour is $50 per person
  • Location: 1011 Third Ave and 60th St New York, NY
  • Subway Stops: N, Q, R, 4, 5, 6
  • Hours: 5:30am-2:00 am
5. Bronx Zoo
If you want to see a really good zoo, skip the Central Park Zoo and come to this one. It is huge and one of the largest in the world. It has free attractions and additional paid attractions. Warning or Tip. The zoo is free every Wednesday and very crowded that day. 
  • Cost: $36.95 per adult, 26.95 per child, discounts for seniors, military and NYC undergraduates
  • Location: 2300 Southern Boulevard Bronx, NY 10460
  • Subway Stops: 2 train to Pelham Parkway, Buses, There is also parking
  • Hours: Summer Hours, 10:00am-5:00pm daily, 10:00am-5:30pm weekends
Another must see in NYC is the Stand Bookstore. It is 18 miles of books over 2.5 million new, rare and used books. It reminds me of Powell's in Portland, Oregon. One of the best things about this store is the story times. They have many character themed story times; Elmo, the Very Hungry Caterpillar show, Harry Potter, Madeline, Pete the Cat, Clifford, and Curious George. Your kids will love it. FYI there are also storytimes around the city at many of the bookstores.
  • Cost: free 
  • Location: 828 Broadway, Manhattan NY 10003
  • Subway Stops: 4, 5, 6, L, N, Q, R
  • Hours: Monday-Saturday 9:30am-10:30pm, Sunday 11:00am-10:30pm.
7. Children's Museum of the Arts
I loved visiting the Children's Museum of the Arts in NYC. My friend told me about it and we went. There are so many fun exhibits and hands on experiences for the kids to do there. The WEE Arts Studio is for smaller kids and features a play area where kids can color, use instruments, and play with play-dough and flubber. The gallery has exhibits on display. The Fine Arts Studio is for all ages to make their own art. The Quiet Lab are seated areas to relax in. I pumped in one of them when I was there, it was nice and private. The media lab teaches the kids how to use digital art equipment. At the Clay Bar kids can make animals, creatures with the help of Clay Bar Teaching Artists. The Sound Booth introduces kids to music making. The Swirl Studio is a place for kids to play on Spun chairs. The Bridge was my kids favorite parts. It is an interactive space that features interactive exhibits with stairs.
  • Cost: $12, under 1 is free
  • Location: 103 Charlton St. NYC
  • Subway Stops: 4, 5, 6, L, N, Q, R
  • Hours: Monday-Saturday 12:00pm-varies, pay as you wish 4:00pm-6:00pm on Thursdays
8. Intrepid Sea, Air & Space Museum Complex
The Intrepid Sea and Space Museum is one of my favorite sites to see in NYC. Why? It is so big and expansive and full of history. The experience includes; third floor and gallery decks, where men lived and worked in the ship, a flight deck where the planes landed and took off, a hangar deck where the planes were stored when not in use, and finally the flight control area which was up a bunch of narrow stairs on the top part of the flight deck.  I was also fascinated it was still sitting on open water along the Hudson River and not on dry ground somewhere.


The Intrepid "launched in 1943, the aircraft carrier Intrepid fought in World War II, surviving five kamikaze attacks and one torpedo strike. The ship later served in the Cold War and the Vietnam War. Intrepid also served as a NASA recovery vessel in the 1960s." It was "decommissioned in 1974."
  • Cost: $33 for adults, and $24 for children, free admission 4 and under. Discounts for seniors, military, and NYC residents.
  • Location: Pier 86 W 46th St & 12th Ave New York, NY 10036
  • Hours: Summer Hours (April 1 to October 31), 10:00am-5:00pm Monday-Friday, Saturdays, Sundays & Holidays 10am-5pm , Winter Hours (November 1-March 31), 10:00am-5:00pm, closed on Thanksgiving and Christmas
  • Subway Stop: A, C, E, N, Q, R, S, 1, 2, 3, 7 to 42nd St, walk or take M42 West bust to Hudson River or 7 train to 34th St, exit 11th Ave.
This is definitely a must see, both boys and girls will love it!

9. The High Line and Hudson Pier
One of my favorite things to do in NYC is to walk around taking in the sights and the smell everywhere. The High Line Trail is an old railway track. It was repurposed because the railroad was no longer running. The developer saw a lot of potential and turned it into a 1.45 mile walking trail. And people love it! There are elevators, ramps, bathrooms and shops. It is stroller friendly! The Hudson Pier is right next to the trail and very nice to walk down. I did this as my activity in NYC one day and loved it. The view of the Hudson River was amazing. The breeze was blowing, the sun was perfect, my daughter was in her stroller. Definitely talk a walk with your kiddos. The Intrepid is just a few blocks north.
  • Cost: free
  • Location: Gansevoort St to West 34th Street.
  • Hours: 7:00am-11:00pm in the summer, closes at 10:00pm other times and 7:00pm Dec 1 to March 31.
  • Subway Stop: 7 at 34th St Hudson Yards
10. Central Park Zoo and other Zoos in town
No visit to NYC is complete without a visit to the Central Park Zoo. The zoo is pretty small and such and is pretty fast to go through. That is why it is on the bottom of the list. But it makes the list because it is the iconic Central Park Zoo. I loved going there, but a warning it looks nothing like the Central Park Zoo from the movie Madagascar. I do not even think they have lions at the Central Park Zoo. The main attraction are the Sea Lions. The Zoo consistent of a main zoo, Gift shop, a 4-D Theater, Cafe, and a Children's Zoo. The iconic Central Park Carosel is just around the corner. If you want to see other more impressive zoos, check out number 5 on this list, the Bronx Zoo. Or check out the Prospect Park Zoo, that one is big for NYC standards.
  • Cost: $18 for adults, and $13 for children 3-12, free admission 4 and under. Discounts for seniors and military.
  • Location: 64th St & 5th Avenue
  • Hours: Summer Hours (April 1 to October 31), 10:00am-5:00pm Monday-Friday, Weekends 10am-5:30pm
  • Subway Stop: N, R or Q trains to 5th Ave/59th St, 6 train to 68th St/Hunter College Station and walk the rest of the way
I hope you enjoy your time in NYC and I hope this list has given you an idea of what to do there. Let me know how your visit goes!
Read More »

Magnolia Bakery Devil's Food Cake with the Best Chocolate Frosting

I do not know if you have noticed, but baking is one of my favorite things to do. I made this cake for my husband's birthday a couple weekends ago. This amazing Devil's Food cake is from the Magnolia Bakery cookbook. I love making cakes and desserts from that book. This cake is super delicious and the frosting is TO DIE FOR. Next time I make this I think I will only do half or third it instead though because it makes a lot.


Magnolia Cupcakes Devil's Food Cake with the Best Chocolate Frosting
Author: Jennifer Crowther
Yield: 36
Prep Time: 30 Min Cook time: 30 Min

INGREDIENTS FOR DEVIL'S FOOD CAKE:
  • 1 1⁄2 (3 sticks) cups unsalted butter, softened
  • 2 cups light brown sugar
  • 3 large eggs (room temperature, separated)
  • 8 ounces unsweetened chocolate, melted
  • 2 cups milk
  • 1 1⁄2 teaspoons vanilla
  • 2 1⁄2 to 2 3⁄4 cups flour
  • 1 1⁄2 teaspoons baking powder
  • 1 1⁄2 teaspoons baking soda
  • 1⁄4 teaspoon salt
INGREDIENTS FOR BUTTERCREAM ICING:
  • 1 1⁄2 cups unsalted butter
  • 2 Tablespoons milk
  • 9 ounces semisweet chocolate, melted
  • 1 teaspoon vanilla extract
  • 2 1/4 cup powered sugar
INSTRUCTIONS FOR DEVIL'S FOOD CAKE:
  1. Grease the pans, add wax paper to bottom. Preheat the oven to 350 F.
  2. Separate eggs before they come to room temperature. Leave milk, butter and eggs out for an hour to come to room temperature.
  3. Sift together the dry ingredients, flour, baking powder, baking soda and salt.
  4. Combine the milk and vanilla.
  5. Using the double boiler method, melt the chocolate. This involves placing a pan of water on the stove and then a heat resistant bowl on top. Place the chocolate in the bowl, stir until melted. IMPORTANT-Do no let any water get in the bowl or the chocolate will seize. Let cool.
  6. Whip butter for 2 minutes in a mixer.
  7. Add sugar and beat for additional 3 minutes or until creamed.
  8. Beat the egg yolks until yellow, add to mixture beating until thoroughly mixed.
  9. Add the cooled chocolate, mix well.
  10. Alternate between adding the milk mixture and the dry mixture 3 times.
  11. Whip the egg whites until fluffy.
  12. Fold in egg whites.
  13. Put batter in pan(s). Bake for 30 to 40 minutes or until the cake is springy to the touch.
  14. Let cool for 10 minutes in pan on wire racks.
  15. Remove from pans and let it continue to cool
  16. Ice the cake.
INSTRUCTIONS FOR DEVIL'S FOOD CAKE:
  1. Leave the butter, and milk out for at least an hour before making the frosting.
  2. Melt the chocolate using a double broiler method. Boil some water over the counter, place a heat resistant bowl on top. IMPORTANT-Do no let any water get in the bowl or the chocolate will seize.
  3. Let the chocolate cool for 15 minutes.
  4. Beat the butter for 3 minutes, incorporating lots of air.
  5. Add the milk and mix well.
  6. Add the chocolate and beat for 2 minutes.
  7. Add the vanilla extract and beat for 3 minutes.
  8. Add the sugar gradually, beating on low. You may need more, you may need less depending on your desired frosting consistency and temperature of the butter.
  9. Spread on your cupcakes and enjoy!
*I use a Wilton straight spatula

*Sprinkles add a very nice touch

*If you do not have time to let the butter cool down, cut the butter into slices and leave on a plate for 5 minutes. Put the milk in a wide bowl.


Read More »

Homemade S'more Cake and Churro S'mores SoBakeable Review


Have you ever had a really good S'more? You know the kind where the chocolate and the marshmallow is melted? We were on vacation in Utah a few weeks ago and had S'mores, but by the time the marshmallow got in the graham cracker, the marshmallow was cold and the chocolate hard. That reminded me why I generally do not eat S'mores. Not that I do not love the ingredients, I do not like the hardness of it all. Well today I just tasted the best S'more I have ever eaten and I want to eat some more. Notice the pun. :) And want to know why? Everything was perfectly melted, the way a S'more should be!

This very yummy post was sponsored by SoBakeable. (I love doing posts like these btw, ones where I get to eat yummy baked items)
What is SoBakeable?
I am so excited to share with you today my review of SoBakeable. They are a San Francisco based company founded by Chloe, who is from Australia and Jocelyn, who is from South Africa. They both moved to the US when their husbands started working here. They spend a lot of time together and really enjoy baking. They decided to start SoBakeable so others could eat the yummy things they made too. They focus on dessert items.

What do They Make?
SoBakeable has kits available on their website for different baked goods. The kits are for beginning to advanced bakers. They even have an app to download for videos and instructions on making their baked goods. Right now their offerings are; S'more Kits, Cookie Cups, Salted Caramel Brownies, Chocolate Lover, Crazy About Coolies, Fresh & Fruity, Fancy Celebration, Vanilla Cupcakes, Sprinkles and Baking Tools. They range in prices from 19.95 to 49.95.

I received the S'mores kit and I can tell you it was delish. The S'mores kit came with instructions for S'more Cake and Churro S'mores.

What's In the Kit?
Each kit comes with all the dry ingredients packaged nicely, a list of wet ingredients to buy, and instructions on how to make the dessert. Here's what came in my kit.

The S'more Cake Kit  came with chocolate chips, sugar, cake mix, crumbs, and meringue mix.
The Churro S'mores Kit came with delicious Smash Mallow Cinnamon Churro, Graham Crackers, and Chocolate Chips.
Baking
I was not too nervous to make the Churro S'mores. They looked pretty easy, melt the chocolate and warm the marshmallows. I was however nervous to make the S'more Cake. I kept putting if off scared I would mess it up. I have never made homemade marshmallow and I was super nervous about browning the top. I thought I would burn it. I decided to finally be brave and went to work. And am so glad I did.

I love to get all the ingredients and tools together before I start so I do not have to look for anything while I am cooking. I love my Breville mixer because it has a scraping mixer attachment so I do not have to scrape the sides.

Here's the finished cake. They even included a liner for the bottom for easy removal. They said to test the cake by toothpick. I did that, but I also like to feel the firmness of the cake. When it is springy everywhere, ie it pushes back up when you press it, it is done.

They had me make a ganache and melt the chocolate in the microwave. I usually use the double boiler method, but the microwave was super easy. I used a Wilton wand to spread the chocolate just like the instructions said.

Here I am starting the homemade marshmallow, so far so good.

And guess what? It turned out! I really surprised myself.  To get the little ridges I spread out the marshmallow and then dipped and raised wherever I wanted a ridge. I could have left it in a little longer, but I was nervous about burning the top. It was hard to tell if it was golden brown in the oven.

And here are the S'mores. They turned out amazing as well.

What did I think?
The food was delicious. The cake was to die for! The sponge was fluffy, the topping was sweet, but not too sweet and the chocolate added a nice layer in between. The S'more was so good. The marshmallows they use for the middle are covered in cinnamon and sugar. Yum!

I was super surprised how well I did. Their instructions helped me develop some more baking skills I did not even know I had. I made homemade marshmallow for goodness sake. I loved that the ingredients were premeasured so I did not have to measure anything. I just opened the bag and threw things in. The cake was super easy to make. I probably made the batter in 6 minutes using my mixer. The only thing I would change is to have more graham crackers. I only got enough for crackers to make three S'mores, but I definitely have enough chocolate and marshmallows to make 14. I will go buy some more graham crackers to finish the S'mores, because they were delicious. Other than that it was an amazing experience baking. I loved everything I made and surprised myself. Hurry to sobakeable.com, enter BAKINGFUN to save $5 dollars, and get baking! You will not regret it.


Read More »

French Toast made with Panera Bread


Recently I went to Panera and placed an order for fresh bread for a sponsored post I did on Instagram.  I was given a gift card to purchase the bread. They were out of the bread I ordered online. They gave me Challah bread instead and told me people liked it for French toast. So what did I do? I went home and made some French Toast and let me tell you, it was amazing! Thanks Panera for such a good idea.

French Toast Made with Panera Bread
Author: Jennifer Crowther
Yield: 8
Prep Time: 5 Min Cook time: 6 Minutes 

INGREDIENTS:
  • 1 fresh bread loaf, Challah bread from Panera, cut in to 6-8 pieces
  • 1 large egg
  • 2 Tbs salted butter melted
  • 3/4 cup milk
  • 2 tsp vanilla extract
  • 2 Tbs sugar
  • 1/3 cup all purpose flour
  • 1/4 tsp salt
INSTRUCTIONS:
  1. Heat skillet over medium heat for 5 minutes
  2. Beat egg
  3. Whisk in butter, milk and vanilla
  4. Whisk in sugar, flour and salt
  5. Cook on each side until golden brown
  6. Serve with your favorite toppings
*Any bread will do

*I used strawberries, whipped cream and powered sugar for toppings


Read More »

The Best Chocolates in Seattle

Are you anything like me and love chocolate? Well you are in luck today. I am going to share my favorite chocolate confectioners in Seattle. My husband and I lived in Seattle when we were first married and dating. While there we found a couple places that had AMAZING chocolates.


Fran's Chocolate
One of our favorite places to get gourmet chocolates is Fran's Chocolate in Bellevue, Washington. We used to go there all the time with our friends when we lived in Seattle. They also have stores in the area: Downtown Seattle, University Village, and Georgetown. Fran Bigelow was inspired to start her business after a visit to Paris. She makes delicious hand crafted chocolates. Her chocolates include caramels that melt in your mouth, truffles, chocolate bars, hot chocolate and fruits & nuts.

This year my husband wanted to get me something special for Mother's Day. He had these chocolates and some mint thins shipped to our house. I was super surprised and excited that he remembered this place from our early married years.

Dark and Milk Chocolate Almond Clusters, Salted Caramels
Read More »

Easy DIY Mother's Day Vinyl Hand Print Project


Mother's day is right around the corner and I have a super fun and easy project for you. The best part is that you can make it with your kids. My kids were super excited to make it. And I have a feeling their Grandma's are going to love it. Here are the supplies for the project. I have outlined the supplies and steps using Cricut tools because that is what I have, but other cutting machines can be used as well.
Read More »

Beauty and the Beast 2017 Soundtrack Review

I am an avid fan of Beauty and the Beast music and have been listening to both the Broadway and animated versions for years since I was a kid. I have seen both versions of the movies and the Broadway play. I was so excited to listen to the new soundtrack from the 2017 live action Beauty and the Beast adaptation. All the soundtracks were written by Alan Menken and have similar sounds. The Broadway version was his debut Broadway composition.


What did I think? Will my kids like it? There were some songs and changes I loved, and other songs where I preferred the original.  It is hard to have three unique soundtracks for the same story, but Alan pulled it off. Alan threw in different instruments, for example a harpsichord was used and changed the beats and climaxes enough to make it different. The words of the original songs changed slightly to adapt the more developed storyline. I liked this album enough to give it a few listens, and my kids love it too.  Read the rest to find out why.

The original animated movie was 1 hour and 24 minutes long featured 15 songs, the new movie is 2 hours and 9 minutes and features 19 songs. I have not seen the movie yet, but listening to the songs there is added depth to the characters. For example the song "How Does A Moment Last Forever (Montmartre)" we find out about Belle's youth especially the time with her mother.  She says,

    "This is the Paris of my childhood
    These were the borders of my life
    In this crumbling, dusty attic
    Where an artist loved his wife
    Easy to remember, harder to move on
    Knowing the Paris of my childhood is gone"

Belle calls this the Paris of her childhood, signifying it was the happy time of her childhood. From this we learn that Belle had a mother, they put some of her things in the attic, her father loved her mother, and that Belle had a hard time moving on.

The new movie keeps the original songs; "Overture" and "The Prologue", "Belle", "Gaston", "Be Our Guest", "Something There", "The Mob Song", and "Beauty and the Beast". The biggest changes I heard wjile listening were the adaptions from the play.  It gets rid of the songs, "If I Can't Love Her, Human Again", "A Change In Me" and "Home". The 2017 soundtrack adds the new songs; "How Does a Moment Last Forever (Music Box)" and "(Montmartre)", "Days In the Sun", "Aria", and "Evermore".

"Evermore" replaces "If I Can't Love Her" from the Broadway version.  It conveys an entirely different message. The most poignant lines of the song are "Now I know she'll never leave me/She will still torment me, calm me, hurt me/She will still inspire me, be a part of/Move me, come what may/Waiting here for evermore!"  The Beast realized she changed him and is happy for it.  He realizes the impact she had on his life. In the Broadway version of "If I Can't Love Her" he says, "Hopeless/As my dream dies/If I can't love her/Let the world be done with me."  In the Broadway version he does not want to go on, in the live action version he does and is inspired to keep living. I love the message of the new song "Evermore" though you can not belt it like you can "If I Can't Love her".

The other big change was "Days In the Sun" from " Human Again" and "Home".  This is another favorite change from the play.  I absolutely adore the new song "Days In the Sun".  Many people did not like "Human Again" and the original VHS that does not feature that song sells for a lot more.  It was trying to be like "Be Our Guest" but missed the mark and sounded too fluffy and happy. The staff are sad because they are not human, but the song is a happy song. "Home" made Belle sound very unhappy in the castle.  "Days In the Sun" is more melancholy and evokes regret of time past. It starts with an amazing opening by Chip recalling his short "days in the sun" and the whole cast remembering their days in the sun wanting to "relive just one".  Belle sings in it too, saying being at the castle has made her stronger, but she still longs to be "free".

How do the old songs compare?  It really depends for me.

  • Emma Watston as Belle- I loved her take on Belle, she sounded excellent. I think there was a little bit of autotune in her voice, but that is okay because she is an actress not a singer.
  • Dan Stevens as Beast-His voice was lower and more proper than I expected.  I prefer the old Beasts songs.
  • Luke Evans as Gaston-He was okay, did not prefer either one.
  • Josh Gad as LeFou-I am afraid to say this, but I can not get Olaf disassociated with Olaf.  I prefer the animated Lefou.  It is hard to imagine his voice being a villain.
  • Kevin Kline as Maurice-I did not like Maurice's song I'm sad to say.  It was a little boring.
  • Ewan McGregor as Lumiere-I loved his take on Lumiere and prefer his version of "Be Our Guest".
  • Emma Thompson as Mrs. Potts-I loved her take on Mrs. Potts. Angela Lansbury will always have a place in my heart. Emma did a great job and I preferred her vocals to Audra McDonald's.
  • Audra McDonald as Madame Garderobe-Her voice was to operatic for me. I did not like her singing in the Beauty and the Beast Finale song. It just did not fit. Her voice reminded me of Carlotta from Phantom of the Opera.
Let us talk about the end credit songs, there are three of them, "Evermore" by Josh Groban, "How Does a Moment Last Forever" by Céline Deon and "Beauty and the Beast" by Ariana Grande and John Legend. I love Josh's and Céline Deon's songs.  Maybe it was because their songs are new and different and they sound amazing.  What did I think of Ariana Grande and John Legend's version of Beauty and the Beast?  If it was the first time this song was released, I would have loved it, but it is not and it was too similar to other versions.  And Céline Deon's version was amazing, and the fact she was also featured in this soundtrack with a new beautiful song really overshadowed their version.  It was almost not necessary to this soundtrack, or it could have been sung by Céline again or not even added to this movie.

Here are the new soundtrack list of songs and which with ones I prefer and like.
  1. Prefer the same-"Overture" (Score) Alan Menken
  2. Prefer the same-"Main Title: Prologue Pt. 1" Hattie Morahan (narration)
  3. Not impressed-"Aria" Audra McDonald
  4. Prefer the same-"Main Title: Prologue Pt. 2" Hattie Morahan (narration)
  5. Prefer the same, but love this version "Belle" Emma Watson, Luke Evans, Ensemble
  6. Not impressed-"How Does a Moment Last Forever (Music Box)" Kevin Kline
  7. Prefer the same but, love this version"Belle (Reprise)" Watson
  8. Prefer the same-"Gaston" Evans, Josh Gad, Ensemble
  9. 2 thumbs up and prefer this version-"Be Our Guest" Ewan McGregor, Emma Thompson, Gugu Mbatha-Raw & Ian McKellen
  10. 2 thumbs up-"Days in the Sun" Adam Mitchell, Stanley Tucci, McGregor, McKellen, Thompson, Watson, McDonald, Clive Rowe
  11. Prefer the Same, but love this version-"Something There" Watson, Dan Stevens, Thompson, Nathan Mack, McKellen, McGregor, Mbatha-Raw
  12. 2 thumbs up-"How Does a Moment Last Forever (Montmartre)" Watson
  13. Prefer the same but love this version "Beauty and the Beast" Thompson
  14. 2 thumbs up for song message, okay for vocals-"Evermore" Stevens
  15. Prefer the same-"The Mob Song" Evans, Gad, Ensemble, Thompson, McKellen, Tucci, Mack, Mbatha-Raw, McGregor
  16. 2 thumbs up except Audra's vocals-"Beauty and the Beast (Finale)" McDonald, Thompson, Ensemble
  17. 2 thumbs up-"How Does a Moment Last Forever" Céline Dion
  18. Prefer the original "Beauty and the Beast" Ariana Grande & John Legend
  19. 4 thumbs up-"Evermore" Josh Groban
I definitely recommend everyone give this soundtrack a listen, there are enough differences to make it new and amazing.  Your kids and you will love it for years to come.

Read More »

Grandma's Sugar Cookie Recipe

Have you ever had an amazing sugar cookie? This recipe by Grandma Rowley's is the best ever. Our whole family makes it. You can find it written on random 4x6 or recipe cards in all our kitchens. It makes soft and fluffy sugar cookies, the best ever. It can be made any time of year. The only change would be the color of sprinkles and frosting to coordinate for each holiday.

Grandma's Sugar Cookie Recipe
Author: Jennifer Crowther
Yield: 24
Prep Time: 10 Min Cook time: 15 Min

INGREDIENTS:
  • 1/2 cup softened butter
  • 1 cup sugar
  • 1 egg
  • 1/2 cup milk
  • 1/2 tsp vanilla
  • 2 1/4 cup flour
  • 2 tsp baking powder
  • 1/2 tsp salt
INSTRUCTIONS:
  1. Cream the butter, add the sugar and beat well. Beat in the egg. Add the milk and vanilla. In a separate bowl combine the flour, baking powder, and salt. Add the dry ingredients to the wet ingredients.
  2. Chill one hour. Cut out to desired shape on parchment paper.
  3. Bake at 375 degrees.
  4. Cook 10-12 minutes for thick cookie, 7-8 minutes for thin cookies.
Read More »

DIY Painted and Patterned Canvases


My husband made a set of 4 canvas paintings with flower prints on for our anniversary last year and to say I was surprised and super excited is an understatement.  Here are the instructions on how to make your very own.

Supplies
  • Design or piece of art
  • Canvas or multiple canvases
  • Pencil
  • Transfer paper
  • Paint
  • Paint brushes
  • Picture hanging hardware
  • Ruler
Steps
  1. Find a pattern or piece of art.
  2. Decide how many pieces and how large the project will be when completed.
  3. Enlarge it in a graphic editing program.
  4.  If multiple canvases will be used decide their spacing and set up, remember this information to put the finished art on the wall correctly.
  5. Print out the design.
  6. Use transfer paper and trace the design on the canvas.
  7. Paint the designs.
  8. Paint the edge of the canvas a color darker than the darkest color in the design.
  9. Add hanging hardware the back of the canvas once the paint is dry.
  10. Hang on the wall using the measurements recorded in step 4.


Read More »

The Perfect Avocado, Ham, Tomato and Cheese Grilled Panini


Grilled panini's are one of favorite lunch items to make.  I like them ten times better than plain turkey and peanut butter and jelly sandwiches.  Want to know the secret ingredient? Believe it or not it's not the panini press, they can be made without, it is fresh bread.  I've tried to make panini's with bread from a loaf, but it does not work, it does not taste the same.  It does not get as flat either. I really like using the avocado and stone ground mustard in the panini instead of regular mayonnaise and mustard. The avocado provides a spread inside, and is much healthier than mayonnaise and the stone ground mustard  provides a depth of flavor with a hint of sweetness.


Acocado, Ham, Tomato, and Cheese Grilled Panini
Author: Jennifer Crowther
Yield: 4
Prep Time: 5 Min Cook time: 5 Min

INGREDIENTS:
  • 1 fresh bread loaf
  • stone ground mustard
  • 1 avocado
  • 2 slices ham
  • 4-5 slices of cheese
  • canola oil
INSTRUCTIONS:
  1. Slice the fresh bread into panini slices. Cut the loaf the width of the panini's. Cut four slices from the cut loaf.
  2. Slice and add the avocado on one side and spread the stone ground mustard on the other.
  3. Put on the cheese, turkey and tomato slices. Place the two halves together.
  4. Turn the burner on a cast iron skillet over medium heat. Cover the pan with a thin film of oil.
  5. This step is important, Using a pastry brush coat one side of the panini.
  6. When the pan is hot, the oil starts to smoke, place the coated side of the panini on the skillet.
  7. Coat the other side of the panini.
  8. Cook 3-5 minutes per side or until golden brown, pressing down with a panini press or a heavy pan. Enjoy!


Read More »

Amazing Steak and Cob Salad

I made this cob salad recipe up when I was shopping in the fresh section of the grocery store.  I love cooking with seasonal ingredients and love getting inspired by seeing what is at the grocery store. It happens to be the time of year again for corn and peppers.  I chose an orange pepper to give a little color to the salad and ham instead of bacon because ham is not as crunchy, but provides the same pork flavor in the salad. The egg creates a nice softness and adds a nice flavor to the salad. 


We have really come to enjoy cooking steaks around here since we learned how to cook them. With steaks and roasts being about the same price as ground beef we have been cooking them a lot more. My local grocery store was having a sale on steaks for the 4th of July so I picked them up and saved a ton.  I have included some of the tips I have learned cooking steaks.


Amazing Steak with Cobb Salad
Author: Jennifer Crowther
Yield: 2
Prep Time: 25 Min Cook time: 10 Min

INGREDIENTS FOR COBB SALAD:
  • 1 corn on the cob
  • 1 boiled egg
  • 2 slices of ham
  • 1 orange pepper
  • 1 head of lettuce
INGREDIENTS FOR SEASONED STEAK:
  • 1 steak, any cut will do
  • 2 teaspoons kosher salt
  • 1/2 teaspoon pepper

INSTRUCTIONS FOR COBB SALAD:
  1. Fill a pan with enough water to cover a corn on the cob, but do not put it in yet. Heat the water to boiling and put in the corn on the cob for 10 minutes.
  2. Put an egg in a pan and fill with water 1 or 2 inches over the egg. Heat the water to boiling over medium heat. When the water is boiling remove from heat, cover for 12 minutes. Remove the water and fill the pan with cold water to stop the egg from cooking more.
  3. Add oil to a pan over medium heat. When the oil is hot add the ham. Brown slightly on both sides. Chop up the ham.
  4. Slice the orange pepper.
  5. Chop up the lettuce.
  6. Combine the ingredient and toss the salad.
  7. I like to dress this salad with Buttermilk ranch.
INSTRUCTIONS FOR SEASONED STEAK:
  1. Leave the steak out 30 minutes before seasoning.
  2. Combine the salt and pepper in a bowl.
  3. Spread the salt and pepper mixture on the steak. Press the mixture into the steak. See above picture.
  4. Turn the over to 375 degrees F.
  5. Heat oil in the pan.
  6. When the oil is hot place the steak in the pan with meat tongs. Do not touch the steak in the first 4 minutes. When the steak has achieved a nice brown sear turn the steak over with the tongs.
  7. Sear the other side.
  8. Place in the over until the desired doneness is achieved. It will be anywhere from 2-10 minutes. Do not over cook.
  9. Let the steak rest for 5-10 minutes.
Seasoned Steak
Read More »

Fresh Raspberry Greek Yogurt

My dietitian recently told me to eat more yogurt.  She recommended Chobani Greek yogurt.  I bought the fruit flavors for a few months. It was okay, but I found the fruit flavors lacking, the fruit didn't taste right. I had a thought to make my own yogurt from fresh fruit and see how it compares.  And let me tell you I bet this yogurt is better than any of those flavored yogurts out there.  It would win in a yogurt tasting contest hands down. It is super simple to make too.

Fresh Raspberry Greek Yogurt
Author: Jennifer Crowther
Yield: 36
Prep Time: 5 Min 

INGREDIENTS:
  • 3-4 fresh raspberries
  • 1 1/2 teaspoon sugar or to taste
  • 1 plain Greek yogurt
INSTRUCTIONS:
  1. Crush and stir the berries with a fork to release the juices.
  2. Add the yogurt and sugar and stir.
  3. Enjoy the freshest yogurt ever!
Read More »

Grilled Chicken with Avocado Salsa


Grilled Chicken with Avocado Salsa is one of my favorite meals to make and I super love all the fresh ingredients. I adapted this recipe from one I saw on Pinterest. I made a few changes based on things that went wrong the first time.

This whole meal took me about an hour to make and gave me family of 4 one day of leftovers.  I did cheat with the rice and use a packaged Spanish rice. I have made it from scratch before, it just adds a extra time.  I started with the rice first because it takes the longest to cook. I love Mise en place, ie the french term for getting all the ingredients and cooking utensils together before the meal.  It really saves a lot of time. That way I can just go go go.

Here are the recipes. The chicken and salsa can be served over rice, orzo or quinoa. I have included Spanish Rice directions.

Grilled Chicken with Avocado Salsa
Author: Jennifer Crowther
Yield: 8
Prep Time: 30 Min Cook time: 15 Min

INGREDIENTS FOR GRILLED CHICKEN:
  • 4 chicken breasts
  • 2 Tablespoons kosher salt
  • 1 teaspoon pepper
  • olive oil
INGREDIENTS FOR AVOCADO SALSA
  • 2 cups tomatoes diced, about 4 medium tomatoes
  • 5-6 fresh green onions, chopped
  • 1/2-3/4 cup fresh cilantro, chopped
  • 1 large avocado
  • 1 lime
  • salt and pepper to taste
INGREDIENTS FOR SPANISH RICE:
  • 1 box ZATARAIN'S Spanish rice
  • 1 can diced tomatoes
INSTRUCTIONS FOR GRILLED CHICKEN:
  1. Heat oil in 2 pans on medium heat.
  2. Turn on oven to 400 degrees F.
  3. Combine salt and pepper in a bowl.
  4. Remove moisture from chicken.
  5. Pat the salt and pepper mixture over the chicken both sides, lightly coating the chicken.
  6. Put the chicken on the pans, do not overcrowd the pan. Brown on both sides for about 3-5 minutes each side. Do not raise the chicken, it will release when ready.
  7. Put the chicken in the oven for 10-15 minutes or until the chicken is 160 F.
  8. Remove the chicken from the oven and let rest on a plate for at least 5 minutes.
INSTRUCTIONS FOR AVOCADO SALSA:
  1. Prepare the tomatoes, green onions, cilantro and place in a bowl.
  2. Cut the avocado last so it does not brown. Place in the top of the bowl.
  3. Juice about 1/2 lime and pour the juice over the avocado.
  4. Stir the ingredients in the bowl together. Add more lime juice to taste.
  5. Add salt and pepper to taste.
INSTRUCTIONS FOR SPANISH RICE:
  1. Prepare the rice per the boxes instructions
I hope you enjoy the recipe. We sure did! 


Read More »

Magnolia Bakery Vanilla Cupcakes and Chocolate Icing

I used to live in New York, whenever I would visit the city I would stop at Magnolia Bakery and get a cupcake.  I was super sad when I moved away.  No more cupcakes :(  I put the Magnolia Cupcake Bakery cookbook on my Amazon wishlist and my husband got it for me for mother's day last year.  I've made several recipes from the book since then.  The recipes usually turn out amazing, especially the frosting, but the cupcakes are a little dry at times.  This time I put in a little less flour and they turned out great! I made the cupcake pictured below for a baby shower.  They tasted amazing. Now you can make them too!


Vanilla Cupcakes Recipe
Author: Adapted By Magnolia Cupcake's Recipe Used With Permission
Yield: 36
Prep Time: 30 Min Cook time: 25 Min

INGREDIENTS FOR VANILLA CUPCAKES:
  • 1 cup unsalted butter
  • 2 cups sugar
  • 4 large eggs
  • 1 cup milk
  • 1 teaspoon vanilla extract
  • 1 1/2 cups sifted self rising flour
  • 1 cup sifted flour
INGREDIENTS FOR CHOCOLATE BUTTERCREAM FROSTING:
  • 1 1/2 cups unsalted butter
  • 2 Tablespoons milk
  • 9 ounces semisweet chocolate, melted
  • 1 teaspoon vanilla extract
  • 2 1/4 cup powered sugar
INSTRUCTIONS FOR VANILLA CUPCAKES:
  1. Leave the butter, eggs and milk out for at least an hour before making the cupcakes.
  2. Preheat over to 350 degrees.
  3. Put cupcake wrapper in cupcake pans.
  4. Sift the flours, measure, and combine.
  5. Beat the eggs until well blended.
  6. Combine the milk and the vanilla.
  7. Cream the butter for at least 3 minutes with mixer.
  8. Gradually add the sugar and cream for 3 more minutes.
  9. Add the eggs to the butter and sugar mixture, beating well.
  10. Alternate between add the milk mixture and the flour mixture. Mix well but do not over beat.
  11. Using a number 20 food disher scoop the cupcake batter into the cupcake wrappers.
  12. Bake for 20 to 25 minutes, or until a toothpick comes out dry and the cupcake is spongy when pressed upon.
  13. Let cool and ice.
INSTRUCTIONS FOR CHOCOLATE BUTTERCREAM FROSTING:
  1. Leave the butter, and milk out for at least an hour before making the frosting.
  2. Melt the chocolate using a double broiler method. Boil some water over the counter, place a heat resistant bowl on top. IMPORTANT-Do no let any water get in the bowl or the chocolate will seize.
  3. Let the chocolate cool for 15 minutes.
  4. Beat the butter for 3 minutes, incorporating lots of air.
  5. Add the milk and mix well.
  6. Add the chocolate and beat for 2 minutes.
  7. Add the vanilla extract and beat for 3 minutes.
  8. Add the sugar gradually, beating on low. You may need more, you may need less depending on your desired frosting consistency and temperature of the butter.
  9. Spread on your cupcakes and enjoy!
PS. You will want to eat everything the icing touches, the real chocolate in the recipe gives this icing a very real delicious edge.


Read More »

Salmon En Croûte with Fingerling Potatoes, Mint Peas over a Hollandaise Sauce

This recipe is amazing. It's blend of flavors of herbs and mustard with a hollandaise sauce provide the perfect combination, with minted peas adding a fresh flavor to the dish. This recipe was featured on MasterChef Junior, this show features amazing kid chefs between the ages of 8-12. Each of the kids had to make this recipe, some did better than others. I can not believe they cooked it by themselves in under 90 minutes.  For Valentines day I thought it would be fun to cook this together with my husband. I made a few errors while making this dish, too much vinegar in the Hollandaise sauce and the pastry dough was a little raw on the edges.  I think I did not flatten it enough.  Overall this dish was amazing!  I can't wait to make it again, perfect this time. Here's the recipe!  I hope you enjoy it as much as I did.


Salmon En Croute with Fingerling Potatoes, Mint Peas over a Hollandaise sauce
Author: Jennifer Crowther
Yield: 4
Prep Time: 30 Min Cook time: 25 Min

INGREDIENTS FOR FINGERLING POTATOES:
  • 12 fingerling potatoes
  • 1 Tbsp butter
  • 1 Tbsp olive oil
INGREDIENTS FOR MINTED PEAS:
  • 1 bag frozen peas, thawed
  • 1 Tbsp to 2 Tbsp olive oil
  • Small knob of butter
  • Handful of mint, leaves roughly chopped
  • Extra virgin olive oil, to drizzle
INGREDIENTS FOR HOLLANDAISE SAUCE:
  • 1 bottle white wine vinegar (about 500 mL)
  • 1 Tbsp peppercorn
  • Bunch tarragon
  • 3 large egg yolks
  • 200 mL clarified unsalted butter (use 1 cup of butter to get this amount)
  • Squeeze lemon juice
INGREDIENTS FOR SALMON EN CROUTE:
  • 1 side of salmon, about 2 lbs, skinned
  • A little olive oil
  • 3 Tbsp unsalted butter, softened
  • Finely grated zest of 1 lemon
  • Generous handful of basil leaves
  • Small handful of dill leaves
  • Sea salt
  • Freshly ground black pepper
  • 1 tbsp wholegrain mustard
  • 1 package Pepperidge Farm Puff Pastry sheets (2 sheets about 500 g)
  • Plain flour, to dust
  • 2 egg yolks, beaten
INSTRUCTIONS FOR FINGERLING POTATOES:
  1. Put the potatoes in a saucepan with just enough water to cover them, and boil for 10 minutes until tender, but still a little firm. Drain, then let cool slightly.
  2. Slice the potatoes lengthways. Melt butter in olive oil, then sauté until lightly golden.

INSTRUCTIONS FOR MINTED PEAS:
  1. Bring a pan of salted water to the boil, tip in the peas and blanch for three to four minutes or until tender.
  2. Scoop them out with a slotted spoon and plunge into a bowl of iced water to refresh. Drain well and tip into a bowl.
  3. Tip the peas and broad beans into the frying pan and add a splash of water and a little butter. Heat for a minute to warm through, season to taste and toss through the mint leaves.
  4. Spoon the vegetables onto warm plates. Serve immediately.
INSTRUCTIONS FOR HOLLANDAISE SAUCE:
  1. Boil the vinegar together with peppercorns and tarragon, reduce by half. Strain and place back in the bottle for future use.
  2. Clarify the butter. Melt the butter in a pan. Skim off the froth. Pour clarified butter in another container, leave the fat at the bottom of the pan in the pan.
  3. Boil a large pan of water, then reduce to a simmer. Using a large balloon whisk, beat together the yolks and 2 tsp of the reduced wine vinegar in a heatproof bowl that fits snugly over the pan.
  4. Beat vigorously until the mixture forms a foam, but make sure that it doesn’t get too hot. To prevent the sauce from overheating, take it on and off the heat while you whisk, scraping around the sides with a plastic spatula. The aim is to achieve a golden, airy foam, which forms ribbons when the whisk is lifted.
  5. Whisk in a small ladle of the warmed butter, a little at a time, then return the bowl over a gentle heat to cook a little more. Remove from the heat again and whisk in another ladle of butter. Repeat until all the butter is incorporated and you have a texture as thick as mayonnaise. Finally, whisk in lemon juice, salt and pepper to taste plus a little warm water from the pan if the mixture is too thick.
INSTRUCTIONS FOR SALMON EN CROUTE:
  1. Check the salmon for pin bones, removing any that you find with tweezers, then cut in half. Line a baking tray with a lightly oiled piece of foil.
  2. Mix the softened butter with the lemon zest, basil, dill and some salt and pepper in a bowl, to make the filling.
  3. Pat the salmon fillets dry with kitchen paper, then season lightly with salt and pepper. Spread the herb butter over one fillet, on the boned side, and the mustard evenly on the other fillet. Sandwich the two salmon fillets together, in opposite directions so both ends are of an even thickness.
  4. Roll out the pastry thinly on a lightly floured surface to a rectangle, the thickness about 1/16th an inch and large enough to enclose the salmon. Put the salmon parcel in the center of the pastry and brush the surrounding pastry with egg. Bring up the edges, trimming off any excess, and tuck them in before folding the rest of the pastry over to form a neat parcel. Carefully turn the whole thing over so that the seam is underneath and place on the prepared baking tray.
  5. Brush the pastry with beaten egg. Lightly score a herringbone or cross-hatch pattern using the back of a knife. Sprinkle with salt and pepper. Cover loosely and chill for 15 minutes. Meanwhile, heat the oven to 400°F.
  6. Bake the salmon for 20–25 minutes, until the pastry is golden brown and crisp. To test if ready, insert a skewer into the middle. It should feel warm for medium cooked salmon. A piping hot skewer indicates that the fish is well done.
  7. Rest the salmon for 5 minutes, then cut into portions using a serrated knife. Serve with hollandaise sauce, fingerling potatoes and minted peas.
*For the Hollandaise Sauce if you eat this for left overs you can use the same method or leave it out for about an hour to get the desired consistency again.

*I found the puff pastry sheets in the freezer section of my grocery store.

*I substituted stoneground mustard for wholegrain because my grocery store did not have wholegrain mustard, just make sure the mustard has seeds in it.

*Overall recommendation, do as much prep before hand as possible. Get out the cooking tools you will need, cut everything, and make the sauces before you start cooking. This will make everything go quicker and help so the food will not be cold once everything is done. I made the hollandaise sauce while the salmon was cooking in the oven.
Read More »

The Perfect Kettle Corn

I love the kettle corn from Trader Joe's. I get some every time I go, unfortunately is not often because there isn't one by me. My husband bought me a popcorn popper for Christmas and I was excited to try to make some kettle corn. I picked up some kettle corn topping at the store, popped some popcorn and sprinkled on the topping. Alas is did not taste like kettle corn. So I looked online, found a recipe, tried it and failed, was going to give up, but decided to try one more time. I adjusted the recipe, cooking method and walla, it was perfect. I'll probably be making this several times a week. You don't need a special popcorn popper or a special seasoning just a pot and basic ingredients that you probably have on hand.

                         
Perfect Kettle Corn
Author: Jennifer Crowther
Yield: 4
Prep Time: 1 Min Cook time: 10 Min

INGREDIENTS:
  • 1/3 cup corn kernels
  • 2 1/2 Tbsp Trader Joe's canola oil
  • 1/2 tsp Kosher salt
  • 1/4 cup sugar
INSTRUCTIONS:
  1. Heat oil and 3 popcorn kernels in a large flat pot over medium heat.
  2. Once one popcorn kernel has popped put in the rest of the kernels.
  3. Add sugar and salt evenly around the pan. Stir in with the kernels. Put the lid back on the pot.
  4. Wait for the kernels to start popping. When they start popping lift the pan and shake the popcorn side to side. Set down every once in a while for the pot to stay hot.
  5. When the popcorn starts to not pop as quickly immediately remove from the heat and lay popcorn on parchment paper on a cookie sheet. Use a spoon to spread out the popcorn. It will be a little sticky. And should not be discolored.
  6. Wait five minutes and enjoy. If you don't devour it all right away you can store in an air tight container for several days.
*I used a clear lid. It was very helpful to see what stage the popcorn was at and that it wasn't burning. 
Read More »