Whole house or room by room renovation? Do you have a fixer upper? Are you trying to figure out how to tackle it? Look no further. I will guide you through the different approaches to home renovations and give the advantages and disadvantages to each.
First I want to explain that the difference between a renovation and redecoration. Redecoration is changing color and design elements of a room (paint, curtains), and a renovation changing the structure, ie flooring, structures etc. I will use the term renovation in this article, but redecorating can apply as well.
What is a room by room renovation?
A room by room renovation is when individual rooms are tackled. ie this summer the bedroom is done, next summer the kitchen, next winter the master bathroom. I personally do not like room by room renovations because they end up looking super choppy and disrupt the flow of the home. It feels too completely different when going from one area to another.
What is a whole house renovation?
A whole house renovation is one that is usually seen on the HGTV shows. They look at the big picture and gather a vision for the house. Elements from each room are tied in with one another and everything is done at once. I prefer whole house renovations because they really tie a home together, create a sense of coziness and can add that extra wow factor to a home.
Why do either one?
A whole house renovation can be EXPENSIVE and needs to be done in order...ie If the floors are being redone then the baseboard needs to be removed. Painting the baseboards before removing would be a mistake, trust me I did this one.
A room by room renovation can be less expensive, but it may cost more in the long run and may not make the house as cohesive.
I suggest PLANNING a whole house renovation for the major items, but making a plan and focusing on various elements one at a time. Here are some elements to focus on to plan a whole house renovation:
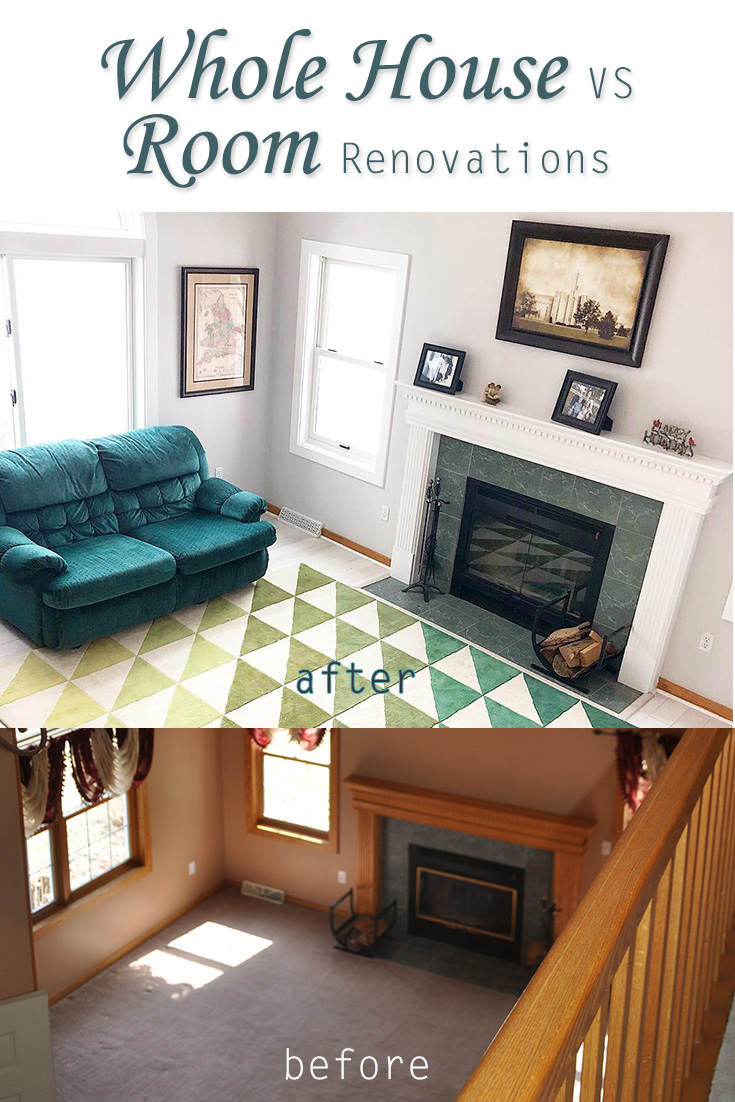
- Find a color scheme for the house. This will help out soooooo much with so many decisions. When we moved to our house we decided to make it light and airy by painting our kitchen and bathroom cabinets and bathrooms, our walls gray, a white wash wood flooring, gray laminate and gray carpet. We decided to do elements of green and blue throughout the house. While doing painting our kitchen cabinets our appliances were black. *PICTURE OF KITCHEN*We did not want to invest the money to change them out because they were in good working order. We antagonized over changing the hardware in the kitchen, they were old and starting to rust. We settled on black. Because we made that decision we are going to change all our door handles, hinges, lighting, towel racks, shower curtains and so on black. It makes it super easy. When we were looking for rugs, shower curtains, window hinges etc for our home we knew what colors we wanted. It is coming nicely and looks super cohesive.
 |
| This was my inspiration color scheme for my home. |
- Make a plan. Plan out each step of the project and make sure things are done in order. Do not make a mistake and paint the baseboards just to have them ripped off and looking terrible the next week.
- Take it one step at a time. We have slowly replaced/renovated one step at a time. We focused on flooring one month replacing the flooring in most of the house. We were super lucky to do this before we moved our household goods in. Another month we worked on painting the entire house. Another month we found rugs for the whole house. Another month I focused on bathroom shower rods and curtains. Another month door hinges. Another month baseboard heaters. Another month we focused on mold in the basement and fixing the entire basement up. And I want to add that finding a good shower rod is next to impossible!!! Target finally had the winner. In the coming months or years we will replace doors, replace door handles, pick out drapes and paint our trim inside our house. Every little step brings us closer to our dream house. It can be cheaper overall this way because items can be bought in bulk, a contractor can come out and do the job all at once instead of for each room, sometimes items can not be bought except in large quantities.
- Be patient. Whole house renovations can be antagonizing especially if everything can not be done at once. But keep a head up because they will get done eventually.
For bathrooms and kitchens I would love to recommend a whole house renovation, but this is not always possible. These areas can be soooo expensive to renovate especially if major changes are being made. Small changes such as light fixtures, mirrors, towels and decor are easy, but changing layouts, cabinetry, flooring and such can be so expensive and hard to do all at once.
For these reasons bathroom and kitchens I recommend room by room renovations with a few caveats.
- Still make a plan and a color scheme. Even if the bathrooms and kitchens will be done in different years make a plan. Create a cohesive element for the home. Look at matching or complimentary cabinet styles, tiles for the bathroom, countertops etc.
- If there is an element desired in both or many places buy extra and save it for the other location. For example if there is an amazing tile for a backsplash but also for an accent in a bathroom, just buy extra and save for the other location. If there is a flooring desired for both rooms buy extra of the flooring and save it for the other location. Trust me if it is not bought at the time there is a very good likely it will be gone when doing the other location. Trends change sooo much. Buy those matching handles and save them.
- If it is affordable do the renovations at the same time. This can help save money on time and materials.


 They thought it would be a perfect tissue holder and put it in their house for 20 years. That thing was there forever! It was kind of symbolic now that I think of it. Often times family members will love and cherish us despite our flaws. And they sure loved me.

 After I got the plant I realized it was a perfect size to put in the "tissue holder" as is. No foam or cutting required. My recycled project took me 5 seconds when I got home.
 This plant and "tissue holder" stays in my bathroom. Instead of making me cringe when it contained the tissue paper, now it brings me joy. I love the look of the plant I got and I picked out a cute clock from Target to go with. I can think of my Grandma and Grandpa and the love they had for me every time I go to my bathroom and that is several times a day.


 Fairfield World, the makers of Poly-fil is turning 80 years old this year! (#fairfield80, #polyfil, #poly-fil, #FFWcelebration) I received the Poly-fil and these goodies for this project.
 To make these pillows I got some pillow shams from Bed Bath and Beyond. I have one bag of 32 ounces of Poly-fil. I opened the bag and filled the pillows to my desired "stuffiness". That is the great thing about filling pillows, they can be as hard or soft as desired. We like medium stuffiness here.
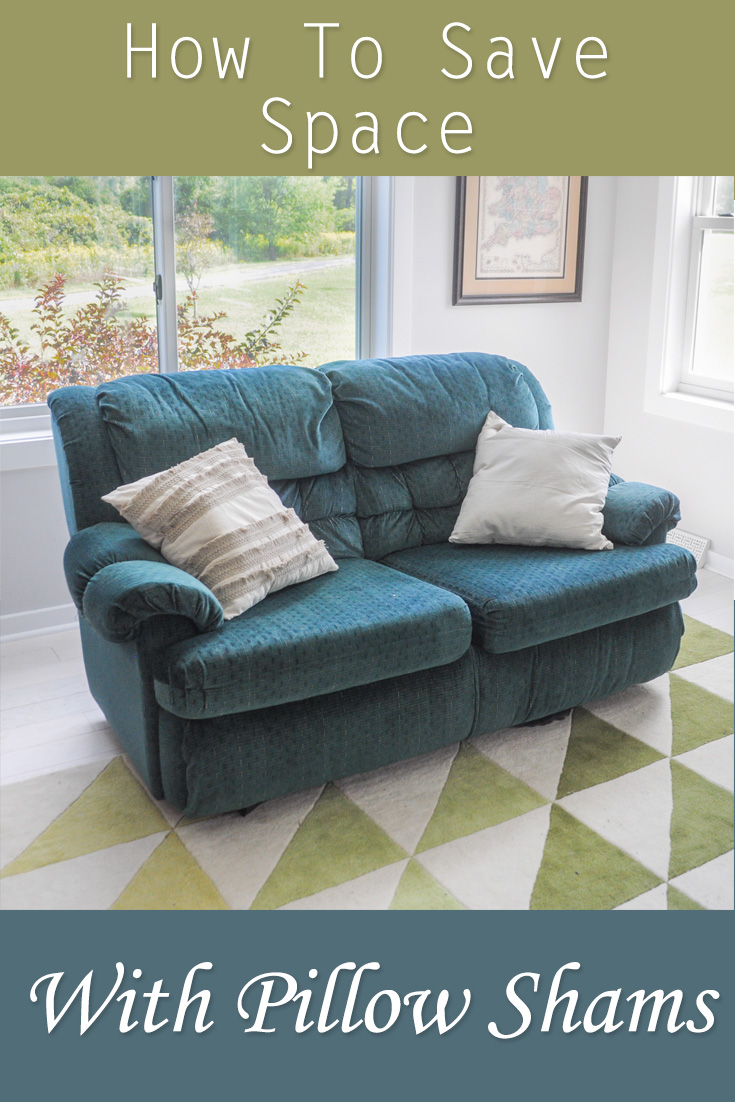
 Here is the finished product. I love how they turned out. They fit in really well with the decor in the room and are super comfortable to sit and take a nap with!
  The perfect thing about this project is if we decide to change the pillows they can be changed out with other shams and folded, not taking up a lot of space!